The old horse doesn't spoil the furrow. An old horse, it doesn’t spoil the furrow Setting up routing d link dir 320
At home or in a small office. Moreover, with its help you can implement both wireless connection of devices and using twisted pair. In the latter case, a limitation is imposed: there are only 4 ports, which is exactly how many devices can be connected.
Equipment
The D-Link DIR-320 boasts the following equipment:
power supply with non-removable cord and plug;
meter twisted pair, crimped at both ends with appropriate lugs;
disk with drivers and an electronic version of the documentation for the router.
user manual;
Appearance and purpose of connection elements, indication and control
An information panel is displayed on the front of the device, which consists of the following LED indicators:
Power: Lights up continuously during operation and indicates that the device is plugged in.
Status: When the router is operating normally, it blinks continuously. If it lights up continuously, an error has occurred and the device must be restarted.
Internet: may simply light continuously (if there is a connection, but no data is being exchanged) or blink (if there is a connection and information is being transferred).
The next 4 ports are wired. When connected, they light up continuously and blink when data is being exchanged. If the port is not used during operation, then the corresponding indicator is disabled.
The last LED indicator is associated with the printer. It simply lights up continuously when a printing device is connected, and blinks while the document is being output.
The following communication and control elements are located on the back of the device:
wireless antenna;
USB port for connecting a printer;
4 LAN ports for creating a wired part of a LAN;
input port for connecting twisted pair cable from the provider;
power supply connection socket;
Reset button to reboot the router.

Selecting a location for installing a network device
At the first stage, we choose the right place for installation. And here, not everything is as simple as it seems at first glance. On the one hand, all wires must be suitable for the installation site of the router, and there must be an outlet nearby for power supply. On the other hand, it is most correct to place the router in the center of the room: this will ensure excellent speed of transmission and reception of information, and a high level of Wi-Fi signal. The router should also not be placed near metal sheets, which can dampen the wireless network signal. Based on the recommendations given earlier, you need to choose the location of the router.
D-Link DIR-320 sequence
The order of this network device model is as follows:
We assemble a temporary circuit for initial setup;
turn on the device and configure it properly;
we analyze the temporary scheme;
install the router in a permanent place;
We assemble a permanent local area network circuit;
turn on the router;
testing the correct settings in the wired network segment;
We check the functionality of the Wi-Fi wireless network.
The router can also be configured at a permanent location, provided that the computer is constantly connected to it by wire. Since this condition cannot always be met, it is recommended to do the setup in 2 stages.

Temporary connection for configuration
The next step in setting up the D-Link DIR-320 router is collecting a temporary diagram for configuring the network device. To do this, install it next to a PC or laptop. We use the complete crimped one to connect the computer and the router. We install one end of it into the port of the PC’s network card, and the other into any of the 4-wire ports of the router (but not the one that is intended for exchanging data with the provider’s equipment). We install the power supply into any nearest free outlet, and the cord from it into the power socket of the router. The temporary diagram is ready.

Set the parameters
Now you need to set the software settings of the D-Link DIR-320. To do this we do the following:
turn on the connected computer and router;
wait for the computer and network device to finish loading;
launch any of the browsers available on the PC;
in the address bar of the browser, type the combination of numbers 192.168.000.001 (this is the network address of our router) and press Enter;
in response, a request will appear with a login and, of course, a password. In the first field, enter admin. The second field is left blank when starting for the first time. If this is not the first launch, then enter the password in the second field, which was previously specified;
in the router configuration interface that opens, select “Connection Wizard”;
then set a new administrator password and confirm it, if necessary;
At the next stage, you need to set the connection settings to the provider’s network equipment. This data is provided by the Internet service provider and is usually specified in the contract. This includes the connection type (for example, PPPoE or L2TP), login and password to establish the connection (if required), static or dynamic network address;
After making all the necessary settings, click the Connect button. The router will then reboot;
after rebooting the router, go to the setup menu using the previously described method and select the “Wireless Network Setup Wizard” item;
then set the name of the wireless network at your discretion;
The next step is to set the wireless network password. Again, at your own discretion;
save the changes and force reboot the router.
The preliminary setup is completed, you can turn off the computer and network device and disassemble the temporary circuit.

We install the router in a permanent place and connect
Now we install the D-Link DIR-320 router in a permanent place that most optimally meets the previously stated conditions. We bring all wired communications here: twisted pair cable from the provider and other devices that connect to the LAN in this way. We connect the incoming wire from the Internet service provider to the “Internet” port. In the remaining 4 ports we connect the equipment that will use a wired connection. We install the power supply into the outlet, its cord to the router socket. After completely collecting the permanent circuit and checking the correct connections, turn on the router.
Checking the wired LAN segment
After the D-Link DIR-320 NRU router boots up, you can test the wired part of the LAN. To do this, on any computer connected to the router using twisted pair, go to the network settings (Start\Control Panel\Network Connections). Next, create a new connection and save it. We close all windows. Launch any browser and enter any Internet address and press Enter. After this, the start page should open. If this does not happen, we check the settings that must be configured to automatically obtain a network address.

Testing the wireless part of the local area network
Next, you need to check the functionality of the WiFi wireless connection. The D-Link DIR-320 router allows you to transfer information at speeds of up to 54 Mbit/s. The connection order in this case is as follows:
The router must be turned on and in operating mode, and not in the boot phase.
We activate the Wi-Fi transmitter on any mobile device.
Go to the “Settings” of the device, select WLAN and click on the “Search” button. Upon completion, a complete list of all available wireless LANs will appear.
We select exactly the network whose name was specified at the setup stage and connect to it. When prompted for a password appears, enter it. At the same time, it is important not to confuse the administrator password for the D-Link DIR-320 and the password for gaining access to the wireless network. It is the second one that needs to be entered, and they must be different.
Subsequently, the color of the Wi-Fi indicator should change: two triangles should appear on it.

Summary
After setting up the D-Link DIR-320 router, this network device will serve you for many years. This operation, as a rule, has to be performed only when starting up the equipment for the first time. In the future, it functions with the specified values, and there should not be any problems with it.
In this instruction for setting up the DIR-320/NRU, we will look in detail at how to configure this router in DHCP mode, changing the MAC address, as well as in PPTP (VPN) client mode. Our manual for setting up the D-Link Dir-320 NRU router can be used for other models from the Dlink line that have a similar web interface and functionality:
- D-Link DIR-300 (ver. B5+)
- D-Link DIR-615 (ver. E4+)
- D-Link DIR-655 (ver. B1+)
- and other “Long” models that we might not have mentioned.
Well... Let's assume that you have in your hands one of the D-Links with a new web interface; you took it out of the cardboard box along with the power adapter and network cable. On the front side of the router you will find LED indicators that, during operation, indicate the “behavior” of the router at a given time (the operation of its interfaces). On the rear panel, to the right of the antenna, you will find 5 network connectors: 4 of them labeled LAN are needed to connect internal cables from home PCs, and into the lonely connector with the inscription INTERNET connect the network cable from Aido (this interface in routers is usually called WAN). To the right of WAN interface is located USB a connector for connecting a 3G modem from a wireless Internet provider, and then there is a connector for power and a button recessed into the body RESET to reset the router settings if necessary.
By 4th LAN To the DIR-320 ports you can connect up to 4 PCs or laptops via a network cable. By the way, one of these blue cables (a regular patch cord) is already included with the router, so you can use it to perform the setup.
We have reviewed the basic information regarding the capabilities of your router, now you can move on to setting it up, but first you need to connect the router to your computer or laptop, after which we will gain access to the web interface of our router.
Connecting a router in Windows 7 and XP
Before setting up your D-Link DIR-320, you need to perform a number of preparatory steps - connect any LAN interface of the router with a blue network cable to the network card on the PC or laptop from which you will perform the setup and connect the power adapter to your router. As for the cable from Aido, it must be connected to the INTERNET (WAN) interface.
Now you should switch the TCP/IP settings on your PC to DHCP client mode (automatically obtaining IP addresses). Below we will look at how to do this using Windows XP and Windows 7 as examples.
Connecting the D-Link DIR-320/NRU router in Windows XP:
Start - Control Panel - Network Connections - Local Area Connection - Properties - Internet Protocol (TCP/IP) – further see the figure:
Connecting the D-Link DIR-320/NRU router in Windows 7:
Start - type View network - select at the top in the search results - View network connections - Local network connection - Properties - Internet Protocol version 4 - then see the figure:

By default, all D-Links issue IP addresses from the range 192.168.0.1/24 to the internal network. Therefore, after 10-20 seconds, your PC or laptop should itself receive an IP address from the router. It will look something like 192.168.0.101 or 192.168.0.102. The inscription that the network card is assigned DHCP means that the router has successfully issued an internal IP address to the computer via the LAN interface. If this does not happen or an IP address appears like 169.***.***.***, then problems with the operation of the DHCP client on your computer are possible. Most often this can be caused by the operation of firewalls (firewalls), but there are other reasons... In this case, we can advise you to enter the necessary IP addresses in the network card settings manually. To do this, it will be enough to specify the following IP parameters on your PC or laptop:
IP - 192.168.0.101
Subnet mask - 255.255.255.0
Default gateway - 192.168.0.1
DNS - 192.168.0.1
Setting up the router
We will configure the D-Link DIR-320 via the web interface. To do this, you need to use any computer browser (Opera, Internet Explorer, Mozilla, Chrome) in the address bar to go to: http://192.168.0.1 (usually all D-Links have this address by default). You will see the router welcome message on your computer screen. To log into the D-Link web interface, you will need to enter your username and password, and then click on Entrance. Default Username- admin, Password- admin:

After entering your credentials, you will see a pop-up message from the router (see figure). This message forces the DIR-320 to change the default password, which will be used to log into the router in the future. All you have to do is click on OK:

N you must enter a new one Password and him Confirmation, then press the button Save:

You will be taken to the main menu of the D-Link DIR-320 router, where you will see Device Information:

Important: to save the configuration after any change in settings (!), you must click on the Save button in the upper right corner each time.
Connecting to the Internet and setting up in DHCP mode, specifying the MAC address
Now it's time to set up the connection between the router and Aido. In D-Link DIR-320 NRU this can be done in step. Connections - WAN, click on the line WAN interface:

In DHCP mode (automatically obtaining IP parameters from Aido), no special difficulties should arise with setting up the D-Link DIR-320/NRU. To do this in the field Connection type you must leave the option in position IPoE.
In field MAC You can make a MAC address identical to the MAC address of your computer on which you were working before installing the router, this will allow you to avoid calls to Aido. If you want to use a router with a “native” MAC address, then fill out this option, indicate the MAC address that can be found on the bottom of the router (six pairs of numbers). To register the MAC address of the router, you need to call Aido technical support and provide this MAC address.
We will not change any more options here; everything will work in DHCP mode. All you have to do is press the button Save:


Now you need to check the functionality of the settings. This can be done in p. Status - Network statistics. Here in the field WAN You can see information that the router's DHCP client has successfully received the necessary IP parameters from Aido. In fact, you can already work on the Internet from a computer that is connected to the LAN interface of the DIR-320/NRU router.

Configuring a router in PPTP VPN “Real IP” mode
To connect via PPTP, you need to create a new interface. (Note: first, we still need to configure the router to work via the WAN interface with the connection type ipoe). Open p. Connections, press the button Add:

To configure the router to work over a VPN connection, you need to set the option Connection type into position PPTP. Next, let's look at the remaining necessary options for configuring the DIR-320/NRU in PPTP mode [top-to-bottom]:
wanPPTPSNameType– allows you to specify how to specify the VPN server address: as a domain name or as an IP address. Choose an option URL;
Server address- here the VPN server address mentioned above is indicated, enter ip.site;
PPP Username- in this option, enter the login for authorization with the VPN server. It can be found in your contract with Aido;
Password- this is the password for connecting to the Aido VPN server (see your contract);
Password confirmation- here you will need to re-enter the password for authentication on the VPN server to avoid typing errors;
Encryption- Encryption of data transmitted via VPN is activated here. We leave the option - No encryption.
Authentication algorithm- here you can select the type of authentication that the Aido VPN server supports. Select the option - AUTO or Automatically.
We do not touch the remaining options and checkboxes in this menu. After pressing the button Save, The tunnel to the Aido VPN server should be successfully installed:

You can check whether the VPN session is up in the menu Connections. In order for traffic to go through the VPN tunnel, be sure to set the flag Default Gateway opposite connection PPTP and save the settings via the button in the upper right corner!

Inscription that the PPTP type is in the state Connected indicates successful actions on your part. If the inscription Connected does not appear, then somewhere in the previous stages an error was made...
Configuring routing for access to local resources
The next step when configuring D-Link routers in PPTP VPN mode is usually filling out the routing table. This procedure is necessary for simultaneous access to local resources of the Aido network when a VPN connection is established. Actually, if you are not very interested in local resources, then you can skip this step. For those who plan to use local services such as torrents in the future, they will have to configure routing. You can do this in DIR-320/NRU at Additionally — Routing. This menu is a table for entering static routes.
To create a new local route in D-Link DIR-320/NRU you need to click on the button Add:

In field Destination network you should indicate the destination area of this route, indicate 10.0.0.0 .
In field Destination network mask you should specify the subnet mask for a specific route, indicate 255.0.0.0 .
In field Gateway you should indicate the address of your local gateway (you can find it out from your contract or you could see it in the state of the local network connection on the computer that was connected to the provider’s cable before installing the router).
In field Metrics can be supplied 1 or 10 . This value specifies the priority for this particular routing rule.
In field Via interface leave option<Automatically>, then the D-Link DIR-320/NRU router itself will determine on which interface it is more appropriate to use this route.
To create a rule, all you have to do is click the button Save:

After entering all the necessary routes, all that remains is to save the router parameters by clicking on the button Save. At this point, the routing setup in the D-Link DIR-320/NRU router can be considered complete.

Setting up a Wi-Fi connection
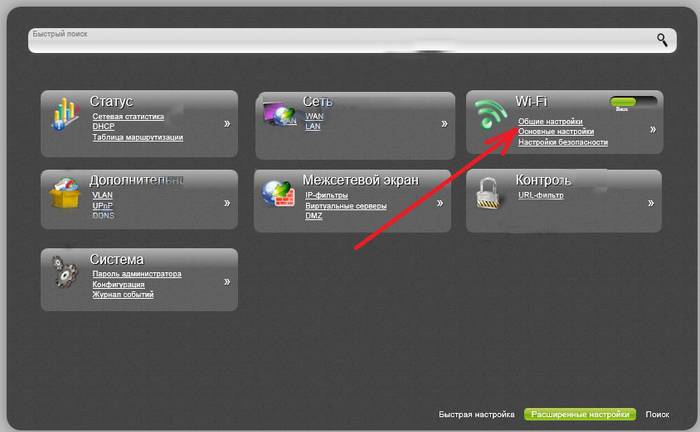
The D-Link DIR-320/NRU router allows you to transfer data over a wireless network when using appropriate Wi-Fi equipment on the client side. Setting up a wireless Wi-Fi network in the new D-Links of the DIR series is done in paragraph. WiFi – General settings. Here you can completely turn off the Wi-Fi module in your router. The router will then change from wireless to wired.

Go to p. basic settings, where you can set the name of the network and select the wireless standard.
Hide hotspot— disables the distribution of network identifier (SSID), this allows you to hide your network from devices running Windows OS, acting as a security tool. However, in this case you will have to create a profile to connect to the wireless network manually.
SSID– name of the wireless network (network identifier). Under this name the network will be visible in wireless Wi-Fi clients.
A country- option Russian Federation.
Channel— forced selection of a channel for wireless communication. We do not recommend dealing with channel number 6 , since most Wi-Fi equipment operates on this channel by default (few users change it). Ideally, we recommend choosing the channel 1 or channel 12 to minimize the likelihood of interference with neighboring networks.
Wireless mode- here you can select the wireless mode 802.11g or 802.11n, or maybe even the outdated 802.11b or a combination of both. In mixed operating mode (802.11 B/G/N mixed), keep in mind that the overall network speed when connecting diverse clients will drop to the level of the slowest client.
Below you can set Maximum number of clients that will connect to the router.

Wireless network encryption is configured in p. Security Settings.
In option Network authentication You can select the encryption algorithm for your wireless network. We recommend choosing the most versatile option WPA-PSK/WPA2-PSK mixed– this will provide support for most modern Wi-Fi equipment.
In field PSK encryption key You set a password for your wireless Wi-Fi network. We recommend using a password here that is 8 to 10 characters long, consisting of uppercase and lowercase letters, special characters and numbers. This minimizes the likelihood of password guessing by attackers.
In option WPA encryption You can select an algorithm for WPA encryption. TKIP– less crypto-resistant option compared to AES, nose AES Some wireless clients may not work. We recommend setting the option TKIP+AES, then you will ensure compatibility with most Wi-Fi clients.
WPA key renewal period can be left as default.

I would like to say a few more words about one more option in Additional settings wireless network. Here's the option TX power responsible for the radiation of the wireless antenna. You can experimentally lower it to a level where it will be enough to cover an apartment/room, and the network will not look much outside the apartment. This will reduce the likelihood of your wireless network being hacked by your hacker neighbors :) And it will have a positive effect on your health, especially if you quit smoking 😉

At this point, setting up a wireless Wi-Fi network in the D-Link DIR-320/NRU can be considered complete. To use Wi-Fi at home, the manipulations discussed above will be sufficient for you.
Port forwarding for torrent
Setting up port forwarding (port forwarding) must be done if you plan to use programs and devices on your home network that require unsolicited access to them from the Aido local network or the external Internet. For example, this may be required when accessing a home IP web camera or when working with file-sharing services such as torrent. The principle of port forwarding is as follows: You independently tell the DIR-320/NRU router what type of unsolicited traffic from outside the router should be forwarded to a specific IP address of the home network.
Let's look at port forwarding in the D-Link DIR-320 NRU for Utorrent:
You can configure Port Forwarding in a D-Link router in p. Firewall - Virtual servers. In this menu of the Dlink router you can create the necessary rules for port forwarding. Moreover, these rules can be created either based on ready-made templates or for specific traffic. New rules are created after clicking the button Add:

Open the Utorrent settings for connection parameters and put them in the following form. IN Incoming port indicate the port that we would like to forward in our router:

Next, let's go back to the router's port forwarding menu and create a rule for forwarding connections from Utorrent to the IP of our second computer on the home network. When creating a port forwarding rule, take into account that the second computer has an internal IP address of 192.168.0.222. We will forward TCP and UDP traffic on the port 22222 , which we will reflect in our rule:

We also note that for Utorrent to work correctly, you will need to connect your “Real IP” service; port forwarding alone in the router will not be enough! Without a dedicated IP address, you will not be able to fully distribute torrents, because... will interfere with NAT in Aido. In most cases, without a dedicated IP, torrent distribution will be only 1/3 of the channel width.
This is all the necessary configuration that may be required during home use of routers DIR-620, DIR-300/NRU, DIR-615, etc.
If you purchased a new router or moved to a new place of residence with old equipment, then most likely you will need to configure the d link dir 300 Rostelecom router. This process is not as complicated as it seems at first glance. In this article we will prove this and consider all the stages of this procedure, as well as setting up the d link dir 320 Rostelecom router.
- Preparing the router
- Setting up a router dir 300 Rostelecom - old firmware
- New firmware and work with the dir 320 model
- Enabling WiFi protection
- Conclusion
You can read how to connect Interactive TV through a router here.
After successfully logging into the main interface, the router will most likely prompt you to change the standard password to your own. We enter the invented combination of characters in two fields, confirm and go through authorization again, but with new data. If everything is done correctly, you will see the main menu in the form of blue “buttons” of a fairly large size.
To start setting up the network, perform the following operations:
- click on the first (lower left) button of the second line “Configure manually”;
- In the top text menu, select “Network”;
- open an existing “WAN” connection;
- Scroll down the page and click “Delete” in the lower right corner;
- wait until the page refreshes, the “Add” button appears on the right, click on it;
- on the settings page that opens, specify the type of Internet connection – PPPoE;
we do not touch the port; - choose any name (this will be the name of your connection in “Network Connections” on your computer);
- Below we indicate the login from the agreement with Rostelecom, as well as the password;
- save the changes made, then click “Save” again in the center of the page.
- open the WiFi menu item (located next to “Network”);
- in the SSID field, enter any name for your network and move on;
to set a password, save the changes and select from the available WPA2-PSK options; - Enter the password you created and save again.
How to disable the Gudok service.
You can read about the transfer of subscribers of the mobile operator Rostelecom to Tele-2 here.
From this article you learned how to set up a dir 320 router for Rostelecom, as well as its previous model, and these instructions should work in most cases. If you have such a typical problem as the web interface being unavailable via IP (that is, the browser does not open the authorization page after entering the combination 192.168.0.1), then again go to the Internet protocol properties (where we set automatic IP/DNS acquisition) and switch network for working with static data. In the fields that have become active, indicate:- 168.0.12;
- leave unchanged (should fill in automatically);
- 168.0.1;
- DNS data from the contract;
- also stated in the contract.
And that's all. Tell us about your experience connecting to the Internet. Any questions in the comments are welcome!
In order to connect your computer to the Internet, the user needs to configure his router and himself. Only after this will it be possible to easily open various electronic pages of websites and download the necessary information.
Connecting a router
Setting up and connecting the D-LINK DIR-320 router begins with checking the functioning of important network nodes on the router itself and the computer.
To get started, you need to do the following:

If everything is done correctly, then you can start setting up the router itself and the connection.
Login to settings via web management
Before you start setting up D LINK DIR 320, you need to check the operation of network devices.
To do this, you need to perform the following procedure:
- go to start and select the “control panel” option;
- in the window that opens, you need to log in to the shortcut link “Network and Sharing Center” or “Network and Internet”, and then “Network and Sharing Center”;

- open the option “Change adapter settings”;
- Click on the “Local Area Connection” shortcut with the right mouse button;
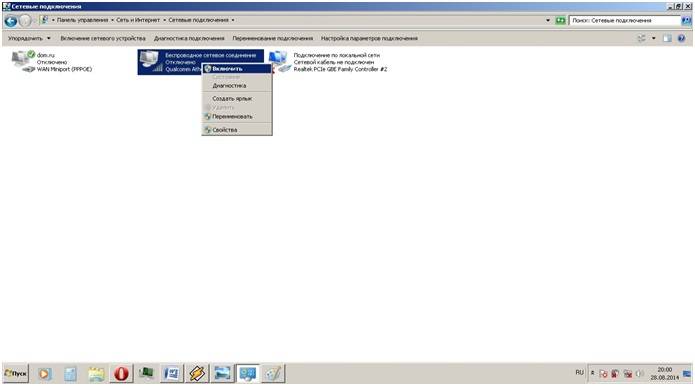
- if the “connect” option appears in the operational window, then click on it; if disconnect appears, then simply close the operational window;
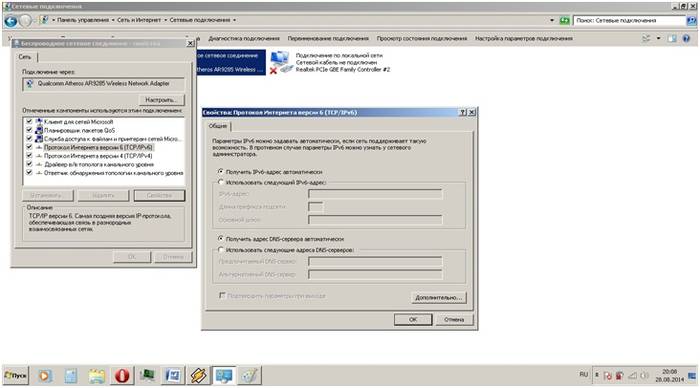
- then you need to open properties in the same operational window to open a new window;
- in the new window, select the line “Protocol ... 6” and click on the “properties” option and in the next window select the automatic configuration option;
- perform the previous operation in a similar way, but with the line “Protocol ... 4”.
These steps are necessary to prepare the automatic configuration of the d-ink dir 320 wifi router and local network.
After setting up a local connection, you need to launch the disk included with the router. It is necessary to create a local connection to the Internet and configure the router itself. This is done according to the prompts that pop up in the installation window.
Particular attention should be paid when choosing the connection technology parameter - pppoe or l2tp. You should choose a connection format in accordance with the parameters specified in the Internet connection agreement.
The next step is configuration via the web interface. To do this, you need to type the IP address 192.168.0.1 in your Internet browser.

The login and password are in the instructions, which the system will prompt you to change after logging in.

After changing the login and password, an interface will appear on the screen in which all connection parameters will be indicated, including all possible settings parameters based on the provider’s technology.

Firmware update
The standard router kit includes a disk with software necessary for the correct operation of the network device, but this does not guarantee the uninterrupted and correct functioning of the D-LINK DIR-320.
How do I configure and install the latest version of the required drivers?
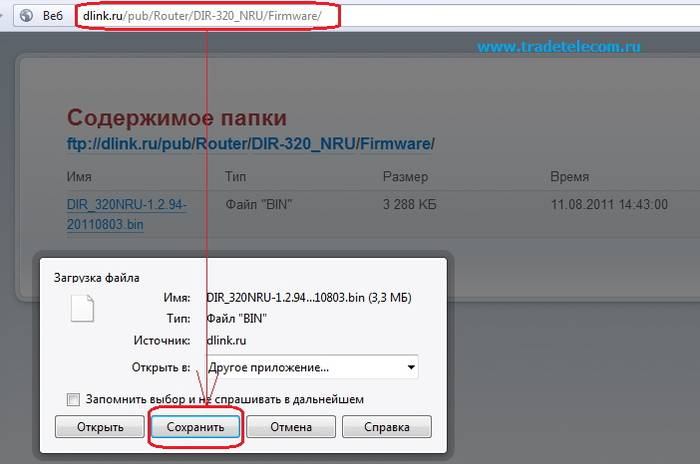
Software updates for the D-LINK DIR-320 router can only be done using the home Internet page – 192.168.0.1. This procedure should be carried out immediately after installing the basic software from the disk by following the link “ftp://dlink.ru/pub/Router/DIR-320_NRU/Firmware/”. Download and save the file to your desktop.
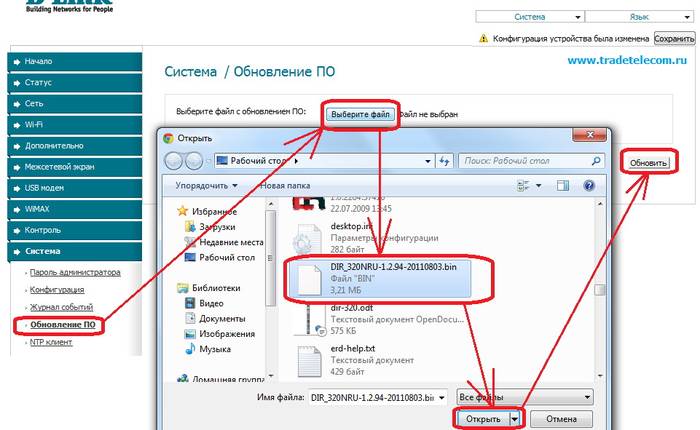
Thus, the path to the file is set, on the basis of which the router software will be updated. When carrying out this operation, you cannot turn off and restart the computer before it is completed, otherwise a failure may occur and you will have to start installation and configuration from the very beginning.
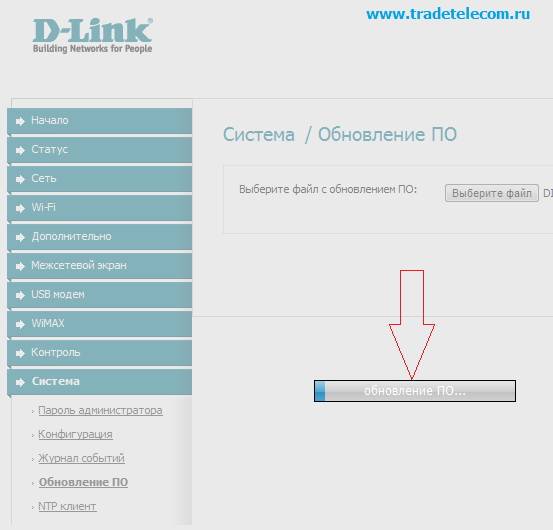
When the update is complete, the DIR-320 will reboot.
Setting up the D-LINK DIR-320 router from providers
The providers themselves often take advantage of the information weakness of users, most of whom are simply afraid to get into the hardware and figure it out on their own. In this regard, it is always possible to call an appropriate specialist to your home to carry out the appropriate work on setting up the Internet.
For example, you can order setup of the D-LINK DIR-320 router from Rostelecom by dialing the technical support number. The operator will listen to all your problems and offer a convenient time to call a company specialist at your home.
In fact, all these steps are simple, and you can do them yourself without additional expenses.
To do this, you must adhere to the following sequence:

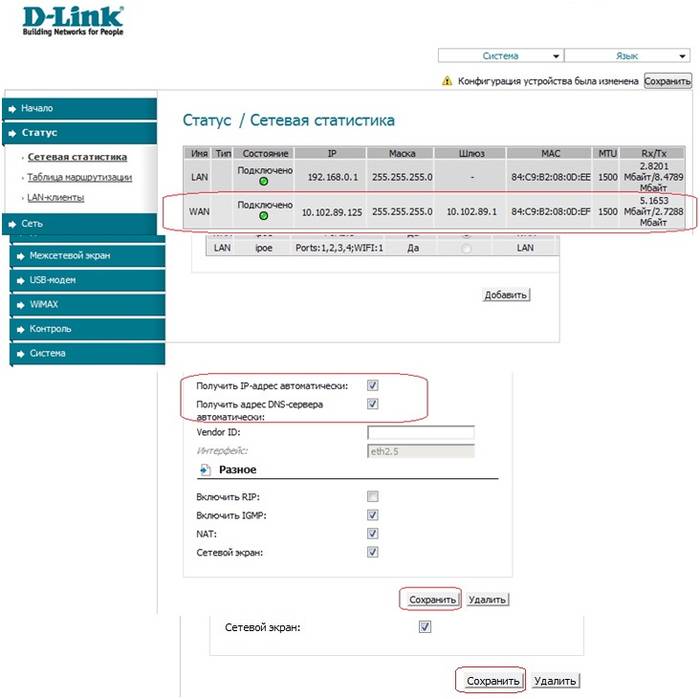
This sequence of setting up an Internet connection is applicable to the Windows 7 and 8 operating systems.
Setting up for Rostelecom
To configure the D-Link DIR-320 router on the Rostelecom provider network, the user must go to the router’s home page (192.168.0.1) and perform the following steps:
- in the tab on the main page, select the “network” tab;

- click on the “Wan” option;
- the Wan connection setup wizard will appear in the updated window;
- when selecting the connection type parameter, select “pppoe”;

- click on the “next” option;
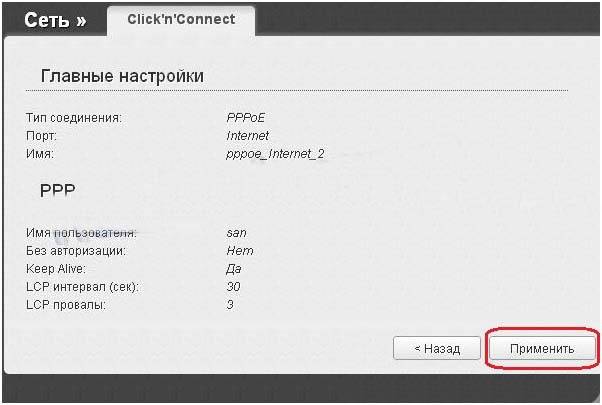
- in the updated window, indicate the name of your network (it can be arbitrary), username and password (specified in the contract);
- then click “next” and “apply”. The parameters are saved in full and displayed in the updated window;
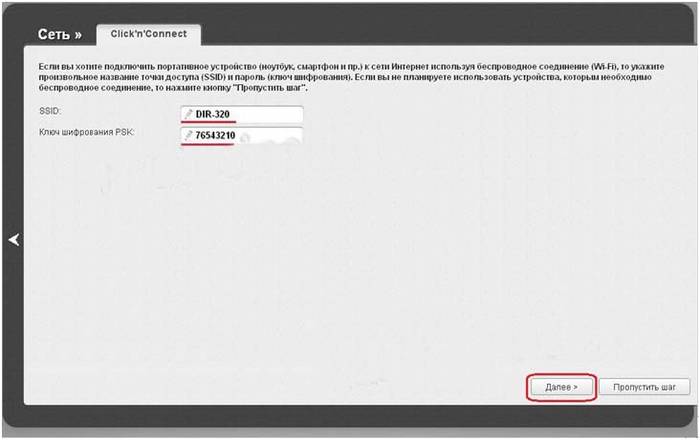
- after which we proceed to setting up a wireless connection using the dir320 router, where the name of the wireless network and password for entering it are indicated (indicated arbitrarily, but in accordance with the instructions of the router) and save
Setting up for Beeline
Setting up the D-LINK DIR-320 router for the Beeline provider differs from Rostelecom, because they use the connection type "l2tp".
So the user's actions should look like this:

If everything is done correctly, the user will be able to freely use the Internet.
Setting up for MTS
Connection to the Internet from the MTS provider uses “pppoe” technology.
Therefore, setting up the D-Link dir 320 router will proceed as follows:
- checking the operation of the network device;
- go to the router’s home page in the Internet browser 192.168.0.1;
- install drivers;
- update drivers;
- go to the “network” tab and select the “connections” line;
- in the window that opens, select the “add” option;
- connection type is set to “pppoe”;
- check the “allow” box;
- in the line “physical interface” set the parameter “port5”;
- in the user name and password lines we enter the corresponding data from the agreement with the provider;
- in the “NAT” and “firewall” lines, check the boxes;
- save the parameters and configuration.
Video: Setting up a D-Link dir router
Setting up Megafon
Internet from Megafon is mainly provided using 3G technology. Therefore, all settings are set manually:
- go to the router page 192.18.0.1;
- select the “Internet installation” column;
- in the updated window at the bottom, select the option “set up an Internet connection manually”;
- in the window that opens, select the connection type “3 GUSB adapter”;
- in the fields of login, password and dial number in accordance with the parameters issued by the provider under the contract;
- save the parameters.
Wireless connection
Network operation via the wi-fi module of the DIR-320 router is very simple and convenient. To set up a wireless connection, just follow the prompts during the initial installation of the driver on the router. If a corresponding message appears during the installation process, you should set the recommended parameters according to the prompts.
The main attention should be paid to the settings of the network card on the computer to support a wi-fi connection. In this case, you need to go to the control panel, and in it select the network and sharing center. Next, enter the option to change adapter properties and check the operating status of the wi-fi module. If everything works, then the connection to the Internet will occur immediately and without delay.
Wi-Fi connection settings in Windows 7
If the connection to the Internet does not occur automatically, and this only happens when using older versions of D-LINK DIR-320(b1) or the windowsxp operating system, then manual configuration will be required. To do this, you need to go into the settings of the wireless connection adapter and manually set the IP and DNS address. In this case, the IP address will correspond to the router address, and the submask (dns) will be 255.255.255.0.
Next, the user must create a new connection without changing the parameters. You only enter your login and password information to connect to the Internet, and a shortcut is created on the desktop, when opened, a direct connection occurs.
Thus, in order to fully configure your D-LINK DIR-320 router, you need to:
- carefully read the instructions for the router;
- check the operation of the network card and local network settings on the computer;
- install drivers and configure the connection according to the prompts during the installation process;
- update drivers to the latest version.
Experienced users can easily cope with such a task, but for beginners it will be difficult. But if they configure their router strictly in accordance with the indicated order, then the result will not be long in coming.
>On many devices, setup is quite easy if you know all its nuances. To make the connection, you need to outline a plan for the sequence of operations to configure the main equipment to work on the global network together with the device and implement the setup of the D-Link Dir 320 router.
Work order
The instructions we will follow are as follows:- Setting up a network card in relation to different operating systems using the example of Windows XP and G7.
- Troubleshooting problems when turning on and operating the modem.
- Replacing an old chip or flashing a new one for proper operation of the D-Link Dir Wi-Fi router.
- Basic network settings for different operators.
- Setting up a Wi-Fi network.
Setting up a network card
Before installing the router, it is necessary for the computer to recognize the network card, then you need to set the IP address to the “automatic” position. This is necessary to synchronize the settings of your PC with the D-Link device, which has this specified in the factory settings.We proceed according to the following scheme:
- Click on “Start” and enter it.
- Click on “Control Panel”.
- We find the picture with the inscription “Network connections” and enter.
- In the window that appears, select the picture next to which there is the inscription “Local Network Connection”.
- Then right-click on it and find the “Properties” item.
- Having entered it, put a tick on the inscription “Protocol (TCP/IP)” and click on “Properties”.
- At the end, put the dots on “Automatic” and click “OK”.
The scheme is as follows:
- Click on “Start”.
- In the search engine (the line right above the “Start” button) enter the word “Network”.
- In the window that appears, look for the inscription about the local network and click 2 times.
- Then, by clicking on “Properties”, look for “Protocol version 4” and double-click.
- Select “Automatic” and click on “OK”.

How to set up a D-Link Dir 320 NRU router without problems
After setting up the card on your PC, you need to make sure the IP address is correct.Return to the item labeled “Local Area” and in the window that opens after double-clicking, select:
- "More details" on Win XP.
- "Information on Win
The IP address will be something like 192. 168. 0. XXX
If the address is not received, then the number will be 169.ХХХ. XXX. XXX.
XXX – any number (for example, 101, 204, 3) not more than 255.
To insert the correct addresses you will need to return:
- in Protocol (TCP/IP) for Win XP.
- Protocol 4 (TCP/IP v4) for Win

At the end, click “OK”.
Replacing an old microcircuit or flashing a new one
We will explain step by step how to flash the router firmware using a PC, in other words, how to reset the original parameters.First download the current version of your device from the pages indicated in the figure:

To perform a reset and create the necessary settings for some models, you need to disconnect the Internet cable from the PC. So, check both options.
How to login - Link 320:
- Connect your router to your PC and log into your browser.
- You must enter the following in the address line: 192. 160. 1 – then press Enter and log in.
- Enter the word admin in the “Login” field, and then Next or OK.
- Enter the word admin in the “Login” cell and in the “Password” column.
- In older D-Link devices, the firmware version looks like this:

To flash:
- go to “Maintenance”;
- then on the left in the “firmware update” menu;
- then click on “Browse”;
- find a new firmware version;
- At the end, click “apply” and wait for the result.

First option.
We look for the word “System” in the left menu and click on the button. Next, in “Software Update”, turn on the “Browse” scanner and select the required file.
Second option
“Configure manually” – “System”, go to the “Software update” item and select the file.
Third option
“Advanced settings” – “System”, then click forward and click on “Software update”.
- After all the switches, you need to click on the apply button (“Update”).
- Next you will need to wait about 7 minutes. This is necessary to complete the operation completely.
- As soon as the installation occurs again, you must enter 192. 168. 0. 1 into the browser address bar and log in.
Connecting to providers and Wi-Fi
Beeline CommunicationsFirst, go to “Advanced settings” - “Network” - “WAN” - “Add”.
- In the connection columns “Type” and “Name” – click L2TP + Dean. IP. in the first and any inscription in the second.
- In the “User” (Name) section and in the “Password” column, enter the information received from the technicians who connected the equipment.
- In the “MZT Address” field, enter – tp.internet.beeline.ru, then “Save” in one window and “Save” in another.


The setup of the D-link Dir 320 Beeline router is complete.
Communication Rostelecom
The primary actions are the same as in connection with Beeline. Further:
- In the “Type” column, click PPPoE.
- In the “PPP” field – in the “User” (Name) item and in the “Password” column – enter information from Rostelecom employees.
- Click “Save”.

Setting up a Wi-Fi network
It also starts with “Advanced settings”, but then click “Wi Fi” - “General” - “SSID”, enter any inscription - the name of your personal network and click on “Change”.

Next, go to “Security” – “Network Authentication:” – “WPA-PSK2”, enter 8 or more characters in the “Encryption Key” and click “Change”.

Congratulations. You did everything right.
Visual instructions for setting up Dir 320 (video)
Useful video with router settings:You can configure the router yourself. By doing this, you will save money, learn how to set up a device, and, perhaps, start your own business connecting users to the Beeline and Rostelecom networks.
