Which printer to install on your computer. A quick way to install a printer without a disk. What to do if the printer does not connect
Connecting the equipment to a computer requires the installation of drivers. This article discusses ways to install a printer driver from a disk onto a computer or laptop. Since almost all drivers for devices in this category are similar to each other, the installation process is the same.
If you are unable to install the printer, we recommend that you go to the very bottom of the page and download a utility from Microsoft that helps solve errors related to printers.
- First, disconnect the printer or MFP from the computer and insert the driver disk into the drive. New peripheral equipment must be supplied with a disk with everything necessary for stable operation;
- The inserted disc will immediately launch the installation window due to autorun, so wait a bit;
- If the launch does not happen, then go to the “Computer” or “This PC” window through the menu in the Start panel;
- In the window that opens, find the disk drive icon and open it by double-clicking;
- On the disk, in addition to all the files, there must be a file with the EXE extension in the root folder. May also be called Setup or the name of your printer. Open the file;

- Next, either the files will be extracted to the folder you selected, or the installation menu will open. In the first case, after extraction, you must manually run the installation;

Driver installers are similar to each other. Now we will show you how to install the HP Deskjet F300 driver, but if you understand the logical chain of driver installation, then you can install any driver on your computer. Therefore, we ask you to be careful.
- In the window that opens, click the “Next” button, you may be immediately asked to install the driver, then click “Install” (if there is a corresponding button). For example, the HP installer;

- As the drivers are installed, the program may ask you to accept the license agreement. If you refuse, you will not be able to install the driver. Therefore, we agree.

If you are asked to connect the printer to the computer - power and USB cable, then complete these operations. After completing all the steps, wait for the process to complete. If everything went well, then the equipment should work properly and without any complaints.

Other installation methods
If you were unable to install drivers manually, then Device Manager will come to your aid. It can be found in the Computer Properties window, which can be opened through the context menu by right-clicking on the computer.


Connect the printer to your PC and update the hardware configuration using the corresponding button in the Manager.

Find the printer name in the list and right-click on it. In the menu, select “Update drivers” and click on the “Search for drivers manually” button (2nd item).


In the window that opens, select your computer's disk drive and click OK.

The Driver Update Wizard will automatically scan the contents of the disk and install the entire required set of drivers.
Printer problems and solutions
If the drivers did not help you get the printer working properly, a standard Windows tool will help you. It is available in all operating systems, including Windows 10. Through the Start menu, go to “Control Panel” or use the “Win” + “X” hotkeys (if Windows 10 is installed). Next, go to “View devices and printers.” If you don't figure out how to get here, use the Windows search.

If the computer recognizes the problem, the printer will display a yellow exclamation mark. Properly working equipment is marked with a green checkmark, as in the screenshot.

Completely removing the printer and then reinstalling it may solve your problem. To do this, all in the same Devices and Printers window, through the context menu, select Remove device. Also go to “Uninstall Programs” and make sure there is no driver installed for your printer - in case you want to remove all drivers.

After that, reconnect the printer and install the drivers as described above. If you can’t install the printer, you can use the search on this site. This will download new drivers for your printer.
There is also a special utility from Microsoft that allows you to fix errors related to printers. We ask you to follow this link and download the program to solve the problem with the printer. Launch it, select “Printer” and click “Next”.

All tips apply to the Windows 10 operating system. These instructions will be useful for users of other Microsoft operating systems - the menus and windows are approximately the same.
Installing the Printer Driver
To control the printer, like any other “hardware” device, you need to install a program, or rather a driver, on a PC or laptop. Each printer model requires its own driver. True, Samsung and HP have created a universal print driver for their line of printers and multifunction printers.
So, in order to install a printer driver on a computer or laptop, you first need to download it from the manufacturer’s website or download it from the disk supplied with the printer.
The driver must be compatible with your printer or multifunction printer model and operating system. For example, a printer driver created for Windows XP x32 will not work under Windows XP x64. True, there are also universal drivers that will be compatible in both places.
There are several ways to install the driver. Let's look at them.
Automatic for Windows XP.
After downloading the driver to the PC, run the executable file (setup.exe, autorun.exe) from the driver directory. WITHOUT CONNECTING THE PRINTER to the PC. Next, follow the instructions of the installation wizard. At a certain stage, it will ask you to connect the printer to your PC. Windows Hardware Setup will begin automatically searching for devices. In some cases, it needs to be canceled so that the driver program completes the installation itself.
Manual mode for Windows XP
Click START - CONTROL PANEL - PRINTERS AND FAXES and click Install Printer
Follow the instructions of the installation wizard

At this stage, you need to refuse automatic installation and select “install from a specified location” 
Now you need to click on the “browse” button and indicate the location where you unpacked the archive and the driver. Typically this folder should contain a file with the extension "INF" 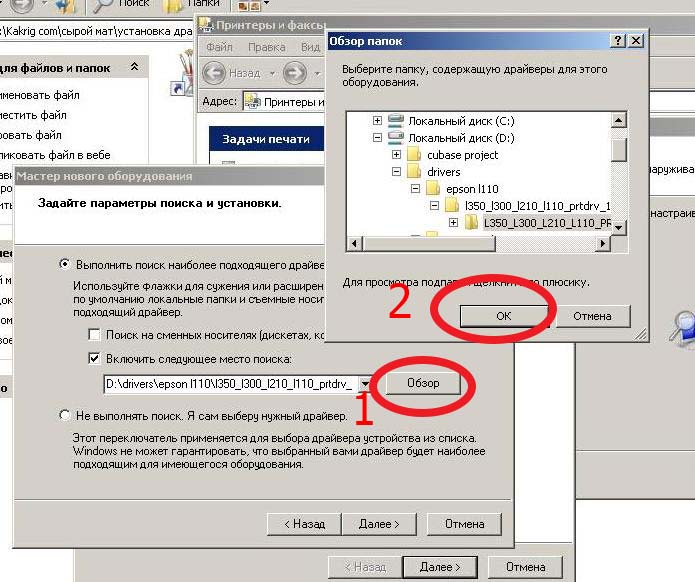
When the path to the driver file is specified, click “OK” and then “Next”  Next, the driver will be installed. It will take some time. Wait.
After upgrading your device to Windows 10, it's time to turn your printing press back on and get started. In this article, you will learn how to set up a printer to print from your computer.
Settings
Printers began their thorny path in 1985, so they can have both different operating concepts and different connections to the computer.
Connection
Based on the connection method, printers are divided into models:
- With parallel or serial connector. An outdated method, no longer used in connection due to slow operation.
- With USB cable. Connection via USB port.
- With LAN port. Connect to a computer or router using an Ethernet cable with an RJ45 connector.
- With Bluetooth adapter. Wireless connection to a computer via Bluetooth technology.
- With Wi-Fi adapter. Connection to PC via Wi-Fi router.
For correct connection:
- connect it to your PC in one of the following ways;
- turn on the device to a 220V network;
- establish a computer connection to the Internet.
Installing drivers
As soon as you connect the printer to your computer, the operating system will automatically search for the required driver. Search and installation may take some time. If the PC does not see the printer, use the driver that is on the disk that comes with it.
If the automatic search is unsuccessful and there is no driver disk:
- In Windows Search, type “Devices and Printers” and check if the device appears.
- If not, use the “Run the Add Printer Wizard” program by clicking on the “Add” button.

- Start scanning. If detected, select the device to add to your computer.

- Did you receive a “No devices found” notification? Click "The printer you need is not listed" and follow the recommendations.

- Also check "Device Manager", the PC may have detected the printer, but the problem is with the driver.

- After successful connection, it is recommended to restart the computer (relevant for older models).

Important! The article provides an example of setting up and working with the Samsung ML-1660 Series printer. The visual appearance of parameters and configurations may differ for other models.
Setting up for printing
You can set some settings in “Devices and Printers”:

To set up printing:
- right-click on the device and select the appropriate item;

- in the “Basic” tab you can select the orientation (portrait, landscape), print quality and type;

- in the “Paper” tab - number of copies, paper parameters, scaling parameters;

- the “Graphics” tab allows you to configure the font and text, graphics controller, density and toner saving;

- In the “Advanced” tab, you can add a watermark and text to a sheet of paper, change the document printing order, and control duplex printing manually.

Default device
If, when sending a document for printing, the program selects the wrong device (for example, OneNote 16), you need to set the connected printer as default. 
For this:

Test page
To print a sample:
Jobs and print queue
Important! There are similar situations: the printer has malfunctioned and the task of printing a document remains in its memory. You no longer need it, but the device will not print a new document until it is finished with the old one. The “Print Queue” function will help you deal with this type of problem.
To go to the “Print Queue”, return to “Devices and Printers” and select “View Print Queue” from the context menu. 
Here you can manage the documents that are queued. You can clear the print queue to delete all tasks, or select and delete one at a time. There is also a pause function. 
Configuring the device for a local network
In order to share the printer on other computers on the local network, you must provide public access. For this:

Setting up a virtual printer
By connecting the device to your computer, you can make it virtual. This means that you can issue printing commands from any of your gadgets (smartphone, tablet, laptop, etc.) via Wi-Fi. To do this, you will need a single Google account. To configure.
A printing device today is already quite a common attribute of not only an office but also a home computer, and operating system manufacturers have provided the simplest ways to connect a printer to a computer. Therefore, the procedure for adding this peripheral device to the set of hardware connected to your computer is not difficult.
Instructions
The main output of information from a PC is carried out through a printer, the installation of which is usually carried out by professional copier installers. This does not mean that the average user is not able to do everything himself. The main thing is to have an idea about the installation of this device.
Checking the integrity of the printer, as well as the availability of the necessary package of instructions and a set of cables are important elements that help in the further use of copiers. The model of the copier, as well as the manufacturer’s brand, must be known by sight. You will need this information to install the printer.


A new copier and an updated system are the key to a successful printer installation on a PC. If you encounter problems with printing on a new printer - often this is due to drivers or a breakdown of the printer itself, you will have to use the help of a wizard.