How to create a group in Odnoklassniki. How to create a group in Odnoklassniki to promote your business Create a group in Odnoklassniki interests
You need your own group on Odnoklassniki not only for the sake of it, but also for running a business, promoting your own brand or website, and other purposes. In order for it to produce tangible results and not just “gather dust on a shelf,” it must first be created and filled with interesting content, and then promoted. Today we’ll talk about how to promote a group on Odnoklassniki from start to finish. We hope that the tips will be useful.
Advantages of creating a group on Ok.ru
Bill Gates, one of the best modern gurus, once said that if a person is not on the Internet, then he does not exist. To paraphrase his phrase, we can express the following thought: if a company is not on Odnoklassniki, it deprives itself of a significant audience. There are several reasons:
- it is on this social network that people from all over Russia “sit”;
- its functionality is not inferior to Facebook and VKontakte;
- It’s much easier for skilled developers to stand out from their short-sighted colleagues.
The only “but” is that Odnoklassniki has much fewer manipulative tools due to the low popularity of the platform among marketers. However, this does not prevent community developers from making good money, including through affiliate programs and selling their own products.
Step 1. Create a group
Before you promote a group in Odnoklassniki, you need to create it. To do this, you need to go from your profile to the “Groups” page. Here you can see what other people are writing about. The most popular topics: entertainment, hobbies, useful tips, jokes, philosophy, and so on.
On the same page on the left there is a noticeable button “Create a group or event”, it is surrounded by an orange dotted line. You need to click on it. A long list of group types will open from which you need to choose yours. It could be:
- public page - suitable for creating news on one specific topic;
- business page - ideal for promoting a company or organization;
- event - a group is intended to gather people united by one goal (for example, go to a museum or cinema, attend a webinar);
- bulletin board - this group is needed to publish news about the sale or purchase of any product or its exchange with other people;
- store - necessary for selling goods via the Internet;
- a group of interests or just for your friends.
After choosing, you will need to fill out a form, indicating the name of your group, its description, subcategory, age restrictions and, if necessary, contact information. Next, you should upload a cover for the community. It should be clear, beautiful and interesting.

Step 2. Form a group
Also, before promoting a group on Odnoklassniki, you should register it. The first step is to choose a background for your community. To do this, click on the colored circle located on the right side of the page. It's very small, so don't miss it. Choose a cover that is more or less thematic. Agree, it will be quite strange to see a background in the form of flowers in a group about cars, and vice versa.

You can upload your own cover for a group on Odnoklassniki when the number of group members exceeds 10 thousand people. In this case, you will need three photographs - the main one (about 1340 by 320 in size), for the background (320 by 320 pixels), and for the catalog cover (about 240 by 90). To do everything correctly, you should pay attention to the tips offered by the system. After uploading, the photo will be sent for moderation and, if all is well, will appear in the group.
Step 3. Make settings
The next step that needs to be taken before promoting a group on Odnoklassniki is to set publicity settings. To do this, you need to go from the group menu to their page. Please note that all parameters are divided into several categories:
- The main thing is that here you can change the information that you wrote when creating the group (for example, rename it or give a more complete description).
- Management - here you can specify who can leave comments on posts, post links in them, write new posts and upload photos. It is also possible to customize the content of the top block.
- Administration - in principle, nothing needs to be changed on this page. The only thing worth doing is to appoint a user as a moderator to weed out obscene and unnecessary messages.
- Applications - here you can select those that you want to see on your group page. These can be tests, surveys, questionnaires, mailing messages, applications from users, various forecasts, booking tickets, and so on. You can also invite social network developers to host your own application.
- Money transfers - this item should only be enabled if your users transfer money to you for any service or product. Good functionality for people making joint purchases.
- Affiliate program - only works if the number of your subscribers is over 10 thousand people. A good source of income.
- Penalty points - if there are too many of them, your group may be removed.
Which of these parameters you need is up to you to decide. For regular groups, it is always enough to configure only the first 4 points.

Step 4. Write some interesting posts
Another step that should be taken before promoting a group on Odnoklassniki on your own is to write several truly useful and interesting posts. This could be any tips, guides, instructions, practical cases, product comparisons or anything else. Advertising messages should be published with great care and less frequently; many users simply skip them.
If you use a group to publish announcements, alternate them with content created specifically for the social network. At the same time, try to post one post from about 13 to 16 pm, and another from 17 to 19. According to Bit.ly, this is the most crowded time on the Internet.
Step 5. Add hashtags
Hashtags should be used to attract attention to written articles. It is advisable that they consist of one or, at most, two words. To add, you need to find the phrase “Add keywords” below the photo, enter them and click on the “Finish” button. Later, using these hashtags, users will be able to quickly find your publication.

Step 6. Invite friends
After 5-10 posts have been written, you can start inviting friends to the group (up to 30 people per day). You can do this from the menu on the left. The button is called “Invite friends”. Another way is to go to the “Participants” page and click on the button with the appropriate name. You can also ask any person to join the group by writing in the “Comments” to his posts. You should not use personal messages for this, as the system may consider such requests as spam.
Step 7. Add people using third-party services
One of the most accessible ways to promote a group on Odnoklassniki yourself is to use the help of various services. For example, vktarget allows you to first earn a little money, and then spend it on buying subscribers. In this case, you can specify both the type of account, its age, and the number of friends. Of course, you can’t hope for quick promotion here, but it’s free. However, you can deposit 100 rubles into your account. This is enough to buy one hundred “living people”.
Step 8. Invite subscribers from other groups
Another way to promote a group on Odnoklassniki on your own is to contact the owners of other non-competitive thematic communities and agree with them on mutual PR. If you still have few subscribers, they, of course, are unlikely to agree to this. In this case, you will have to buy several publications. Moreover, it is advisable to do this with already promoted and well-attended groups.
To view the statistics of someone else's community, you should go to Popsters, log in through the desired social network and enter the address of the group you want to scan. The system will download the results and provide reports on the time of writing and publishing posts, the volume of text, relative activity per day or per week. The only “but” is that the service is paid. You can view prices on the “Tariffs” page.

If you are wondering how to promote your group on Odnoklassniki for free, try also leaving a link to it on the pages of other communities in the “Comments”. Just do it carefully. Your message should not in any way resemble an advertisement. For example, you can write “I completely agree with the opinion of the author of this post. I would just like to add that…” and after a short comment write the following: “Here I wrote about it.” Then leave a link to your post. There is no certainty that such a message will live long, but perhaps someone will have time to click on it.
Step 9. Advertise

Step 10. Place links to the group wherever possible
People who have already had to build up their subscriber base for a social network give the following advice on how to promote a group on Odnoklassniki yourself for free: leave links to your community on any thematic forums, in email signatures, in statuses posted on the main page your account page, in publications on the website. You can also do this on business cards, mugs, and other souvenirs or printed products intended for sale.
Step 11. Post information on the website
You can resort to this method of how to quickly promote a group on Odnoklassniki for free if you have a well-promoted website or blog. As a rule, you can post information about a group in the form of a widget or post. In the first case, you need to go to the “Developers” page, the link to it is located just below the link to “Advertising”. Here you should select “OK for sites” and after the transition, mark those applications that you want to see on your own resource. In our case, this is a “group widget”. All that remains is to act according to the instructions given by the developers of the social network.

You can also create a separate page about your community on the site. But you should write on it not about how to promote a group in Odnoklassniki from scratch, but about its existence and all the advantages of joining. The latter may include possibilities:
- publishing exclusive content;
- participation in any competition;
- participation in interesting discussions;
- consultations with company specialists;
- anything else.
It’s worth trying to come up with something that others don’t have. If it works, the number of visitors will increase a hundredfold.
Step 12. Place a troll in the group
An interesting way to promote your group in Odnoklassniki is to place a real “troll” in it, capable of forcing the audience to act. If real users cannot yet be used as a provocateur, you can create a provocateur account for yourself and “place” him in your community. You should act carefully: users should not even doubt that the page belongs to a real person and not a fake.
To install photos in this case, you should select pictures that are not in the search. To do this, you can either go to English-language sites and select images, or colorize some old black and white photo of yourself and upload it to your profile. There should be several such drawings.
Then you should add several real people as friends, join various communities and publish posts on any topic. After which you can start communicating in your own group. Remember: a troll should stimulate communication, but has no right to offend participants in any way or create an uncomfortable environment for them.

Step 13. Track the effectiveness of publications
For developers who already know how to promote their group on Odnoklassniki, the creators of the social network came up with the “Statistics” service. The link to it is in the top menu, under the word “More” (click on it). Here you can see the number of participants, user engagement and other interesting information. Try to use this information!
As a conclusion
There is no secret technique for how to promote a group on Odnoklassniki. The step-by-step instructions presented on this page are very simple. It will help you go from a novice developer to the owner of a large community on a social network. Just follow it to achieve real results. Good luck!
How to create a group on Odnoklassniki - this question is probably asked by a considerable number of people who have chosen the Ok.ru social network as their habitat. After all, running a separate community is not only a responsibility to future subscribers, but also a great pleasure. We will try to give you an answer not only to this, but also to many other questions that you will definitely have in the process.
There are people who are so active that they simply cannot help but transform the space around them. It is precisely such creative individuals who create various communities in Ok.ru, in which their considerable potential can be fully revealed. If you belong to this type of people, then the question of how to create your own group on Odnoklassniki for free has probably occupied your inquisitive mind more than once.
Finally, you have decided everything. You’ve decided on the topic of your community, chosen the materials you’d like to post in it, come up with an original name that can attract a large audience, and all that’s left for you is the most important thing - creating a group on Odnoklassniki from scratch (by the way, there are quite a few videos on this topic). Our detailed step-by-step instructions below will undoubtedly help you with this.
How to properly create a group on Odnoklassniki based on interests?
- Log in, enter your password and enter your page on ok.ru
- At the top of the page, find the words “Groups” and click on it.

- You will see various publics recommended for you, and in the upper left corner, just below your name, you can find the inscription “Create a group or event.” This is what you need to click on.

- Of the eight proposed options, you should choose the fifth, namely “Group of interests or for friends,” because this is what we are creating.

- Now it's time to fill out the questionnaire, which will contain basic information about your community. First of all, upload a photo, always in good quality, that corresponds to the given topic.


- Now it's time to enter the name in the appropriate line. Make sure that it is beautiful and sonorous enough and can interest the largest number of people - after all, it is by the name that people first judge the content.

- You can also give a short description in the next line, which briefly describes what topic this page will be devoted to.

- Now click the word “Subject” on and select the item that most closely matches your page’s content.

- Determine whether the material posted on it will have an age restriction.

- Now decide whether you want to create a closed group on Odnoklassniki, so that only you can decide who can enter it, or leave entry free for everyone. Or maybe you want to create a community that only a select few will know about, which cannot be found through a search engine, and can only be accessed by personal invitation? Everything is in your hands.

- Also, if you wish, you can provide contact information to contact you, for example, your home address, phone number or your website.

- Well, the last step. Click on the virtual “Create” button and we can congratulate you on successfully creating your own community! May it bring joy to both you and all its participants for a very long time.


How Xyou will understand by reading our other article on this site.
What else is important to know when creating your community?
When you have finally passed the very first and exciting stage, you may have various questions related to the further management and administration of your creation. We will try to answer the most common ones in advance.
How to create a topic in a group on Odnoklassniki?
Of course, creating various themes is exactly what everything was done for. Log in to your new page and scroll down a little - there you will see the offer to “Create a new topic”. Feel free to click on it and a special window will appear in front of you, in which, guided by the system prompts, you can add photos, videos and any information in written form. 
How to create a poll in Odnoklassniki in a group?
Surveys are always interesting and attract many new visitors. In order to create a survey, you should enter the page and click on the inscription “Create a new topic”. This sentence is usually located above previous publications. Now in the lower left corner of the pop-up window, click on the word “Poll”. 

How many people can you invite to a group on Odnoklassniki?
In fact, the number of people who can join the community you create is unlimited. The most successful and popular public pages sometimes gain up to a million subscribers, and it’s up to you whether yours will be included in their number.
Difficulties can arise solely with the number of invitations per day. Experts recommend not sending more than ten such invitations a day, but preferably five or six, then there should be no problems.
How to find out when a group was created on Odnoklassniki?
Usually, such information cannot be found in the public itself. It seems there is no way out, but people who are professionally involved in promoting pages on social networks advise turning their attention to the website smmbox.com, by registering where you can find out such sensitive information. It should be borne in mind that registration can be free only for fourteen days, and then you will have to pay for using this resource.
You can find out from another article on this site.
How to create a group
Instructions
Log in to the Odnoklassniki website using your account or the account on behalf of which you are going to create a group. In the future, this account will become the administrator of this group. In the menu to the right of the photo, click "Groups"
On the page that opens, in the left column, find the “Create a group or event” button immediately below your avatar and name. Click on the button to start creating a group.

Select the type of group you are creating. Choose “By interests” - if your group is created for communication between visitors based on interests, exchange of information, and so on. “For business” - select this option if your group will be associated with your business, i.e. you intend to attract clients with its help. "Event" - suitable for posting information about an upcoming event, such as a concert or birthday party, that you are organizing.

Fill out a short form describing the group. Group Name - Enter a meaningful, easy-to-understand name for the group. 2-3 words are enough. Description - enter an extended description of the group, tell us in more detail what topics you are going to communicate about in this group. Topic - select a group topic for the group directory of the Odnoklassniki social network. Click the "Select Cover" link and upload a small but informative image that will capture the essence of your band. Select an open group if you want everyone to be able to join it without your consent. Select if you want to limit the group members. When all fields are filled in, click the create button.

Congratulations! Your group has been created, you can invite friends to it, add messages and photos. To invite friends, click on the “Invite friends” link under the group avatar.

In the window that opens, select the desired friends and click the "Invite" button. Your friends will receive invitations to the group, and if they like the group, they will join it.

As a group administrator, you can create messages from . All participants will see such messages in the event feed. To write a message on behalf of the group, click in the "Create a new topic" field. Then in the window that opens, click on the icon with your avatar in the lower left corner and select a group.

Classmates
This has ceased to be an innovation - many people order goods on social networks and are satisfied with the purchase.
Therefore, for modern businesses it is important to know how to create a group on Odnoklassniki to increase sales.
Target Audience
First of all, decide whether you need this particular social network.
To do this, compare the portrait of your client and the audience of the selected social network. If they match, then you definitely need to be on Odnoklassniki.
Some statistics:
- 56% of Odnoklassniki users are women.
- The average user spends 20 minutes a day on social media.
- The audience of VKontakte and Odnoklassniki overlaps - 68% of people are registered in both networks.
- 43% of the audience lives in small cities with a population of up to 100 thousand people. These are mainly residents of the Central, Volga, and Siberian federal districts.
- Half of the users are between 25 and 45 years old.
Community creation
So, you understand that your potential customers often visit Odnoklassniki, and you can offer services to them.
If you are already registered in this network, then everything is simple.

Follow the instructions on how to create a group in Odnoklassniki for business:
- Go to the "Groups" tab.
- Click on the “Create Group” button.
- Select a type. “By Interests” is a thematic community with entertaining content. “For business” – information about the work of the company, advertising of goods or services. “Event” – advertising of one event. Any type can be used for business.
- Write the name of the community. It is advisable that it contains keywords by which a person can find you. For example, if you sell designer clothing, the title should contain the brand name and the phrase “designer clothing.”
- Come up with a description. Typically, commercial firms write a short list of services, address, telephone number and hours of operation. For an interest group, this could be a short description of the content (“Photos of cats every day”). To advertise an event, this should include a description of the event, entry cost, and address. It is also advisable to write an advertising appeal that will motivate you to join the community.
- In the “For business” category, indicate the type of activity.
The community is ready, you can start filling it and designing it.
Registration
Now you need to make the page attractive to the user.
Here are some tips on how to properly design a community:
- Upload a beautiful avatar. People most often judge whether to join a group by their avatar. The icon should reflect the direction of activity and also catch the eye. You can put a photograph of the director if he is a famous person; product image. It’s even better if it’s a customer with your product.
- You can decorate the page with a standard cover. You will be able to choose your image when the number of participants reaches more than 10,000.
- In the settings, specify who can upload photos and videos, and who can open new topics. For convenience, enable the “Indicate group as the author of admin publications” feature. Then all your posts will be published on behalf of the community.
- A page on which all posts are united in a single style looks attractive. Come up with your own style of text, photos, videos. Will your posts be short or long? Do you post unique photos or pictures from the Internet? Will you add your logo or captions to the photo?
Filling
 When the page is designed, you need to fill it with content so that users are interested in visiting it:
- Open several photo albums of products, customers or employees.
- Upload a thematic video or video about the company's activities.
- Make several publications about the company, about employees, about the production process or about the benefits of a product.
- Create topics for discussion. These can be standard “Q&A”, “Our prices”, “Reviews”. Or you can come up with your own topics that are interesting to clients.
Video on the topic
Promotion
Now you can start promoting:
- First, add your friends. Ask them to leave comments so other users can see that this is a live page.
- You can advertise the community on your page on this or other social networks.
- If you have a website, add social media widgets to it.
- Place official advertisements in other communities. Remember that spamming can get you banned, so it’s better to do it officially.
As you can see, opening your own group is not difficult. The main thing is to make it interesting for people so that they enter and buy your products.
Odnoklassniki is one of the most popular Russian social networks, with about 75 million active users from all over the world. By visiting the site, anyone can create a page, open a group, or start a survey on a topic for free. Above all, this is a way - through advertising, carrying out simple tasks or direct targeted fundraising.
To create a group on Odnoklassniki, you need to first register by coming up with a first and last name (or indicating the real ones), a password for authorization and linking your account to your mobile phone number. The next thing the user should do is understand the fairly simple interface of the site. Then all that remains is to select and begin to act; The main steps will be described below.
Why do you need a group on Odnoklassniki?
The advantage of Odnoklassniki over other social networks is its adult, solvent and easily classified membership. With rare exceptions, people registered on the site do not intend or do not know how to hide their interests, acquaintances and personal information, which makes them an ideal target audience.
Thus, it is easier to receive money from various advertising campaigns aimed at Odnoklassniki users than to engage in similar activities in areas in which it is impossible to clearly imagine the average “buyer”. A social network user just needs to create a group for free and promote it, relying on system tips and gradually gaining regular readers. Clicks on links and purchases will be ensured - which means that the community owner will not be left without money.
Basic concepts of making money on Odnoklassniki:
- promoting your own business: or any other social network, you can simply offer your product, services or ideas - this is the simplest, legal and understandable way for ordinary users;
- sale of advertising space: an account owner who has achieved popularity can, for an appropriate fee, allow large companies and private employers to place advertisements on their page or publish advertising posts on their behalf;
- direct fundraising: no one prohibits the user (subject to compliance with current legislation) from asking other members of the group he has opened to transfer funds to him on a bank card or any electronic wallet - and the more convincing the requests, the better the result.
Important: creating a group on Odnoklassniki does not have to be commercial in nature. A user who does not yet intend to make money on a social network can create interest groups: for himself or friends or for anyone - just like that, for the sake of interest, pleasure or fun.
The main thing is to remember the law and take into account the incredible readiness of Odnoklassniki to cooperate with law enforcement agencies. If the account owner agrees to these terms (they are presented in full in the section "Privacy Policy OK") and have already decided on the concept, you can start creating a group - following the algorithm presented below, the task can be completed in a few minutes.
How to create a group in Odnoklassniki?
To open a group on Odnoklassniki for free, you need:
- Log in to the site ok.ru by entering your phone number and password in the appropriate fields of the “welcome” window. On your personal page, move down a little, find the “Groups” link and click on it.
- On the new page, if the user has not yet created a group, only third-party offers will be presented. To create your own group, you should use the “Create a group or event” button located in the upper left quarter of the screen.

- Now you need to select the type of group to open in Odnoklassniki. The most common option is a public page, which by default is open to everyone.

- The user who chooses the first option will be asked to fill out a group card, indicating the name and description of the page.

- Particular attention should be paid to the choice of page category in Odnoklassniki and the age limit: both of these criteria are vital to making it easier to find a group among hundreds of similar ones. The first identifies a public page according to classification criteria, allowing it to be distinguished from groups with the same name but different content; the second is, if necessary, to prevent access to the group of minors.

- Using the “Specify additional information” link, the Odnoklassniki user can enter in the appropriate fields the city to which the group is linked, address (as detailed as the creator wants), cell or landline number and web resource recommended to visitors of the public page.

- By clicking on the “Select cover” link, the author of the group has the opportunity to make the group more recognizable; the image may either coincide with the avatar on your personal page or differ from it.

- Having finished entering data into the card, click on the “Create” button, highlighted in orange; Now the user can also go to the design and content of a group in Odnoklassniki, also for free.

- The main difference between a “Group for Friends” and a “Public Page” is the ability to make it completely private, including not indexed by search engines, or open only by invitation. For obvious reasons, making money on this option is much more difficult, unless we are talking about specific types of activities.

- The owner of an account in Odnoklassniki, aimed primarily or fully at selling goods or providing services on a commercial basis, should prefer one of the two lower options for the group being created: “Bulletin Board” or “Shop”. The functionality of these pages will allow you to sell with greater efficiency; Filling out a group card is no different from the previously described manipulations.

- The user can find the newly created group on their personal page in the section of the same name in the main menu. By clicking on the previously selected avatar, he will proceed to further design of the created page.

- A more convenient option is to go back to the “Groups” section, as described at the beginning, and click on the image. In this case, the user, before proceeding to moderation, will be able to remember how many public and private pages he has in Odnoklassniki.

- If mistakes were made when creating a group or the account owner simply changed his mind, he can always delete it by expanding the “Other actions” menu in the description and clicking on the “Delete” link. Please note that the page is deleted permanently and it will be impossible to restore it without contacting the administration of the social network for help.

Important: the administrator of a group in Odnoklassniki, that is, its creator, can change the avatar, descriptions and other details by simply going to the page - it is not necessary to delete and re-create the community each time.
How to create a topic in a group?
To create a topic in a group for free, you need:
- Having logged into it as an administrator, find the “Create a new topic” dialog box and left-click on it.
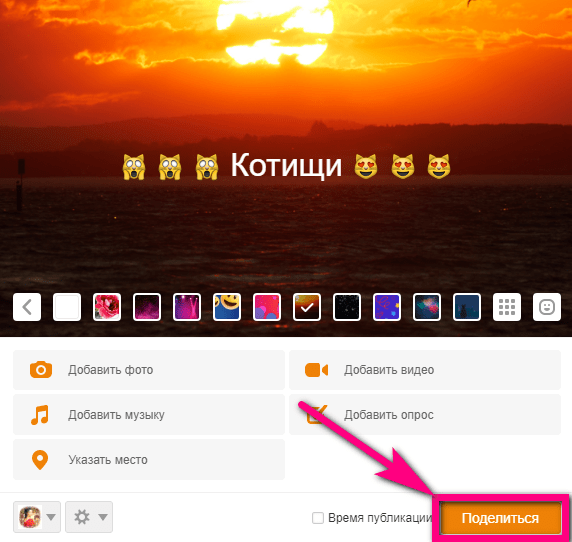
- In the window that opens, select a suitable background by clicking on one of the row of icons located below, and then enter the name of the theme.
- If the icons in the bottom row are too small, the owner of the group in Odnoklassniki can call up the “Gallery” with enlarged thumbnails by clicking on the button with nine identical squares; next to it there is another, no less useful one - “Smileys”: they can be used in the title of the topic.
- By navigating the links below the background selection interface, the user can easily add images, music files, videos, or polls to the theme. By clicking on the gear, he can call up a new drop-down menu before publishing, before publishing, he can send the topic for moderation for free, make it hidden (open only to “his own”) or disable comments on it; The last setting can be changed later.
- By clicking on the avatar next to the gear, you need to clarify where exactly the topic will be published: in a group (the default option) or on the main page of its owner.
- To get more attention, we recommend pinning the topic by clicking on the pin in the top right corner above the background image.
- By calling the drop-down menu located next to it, the group owner or administrator can disable or re-enable comments in a topic, edit or delete it altogether: to do this, simply follow one of the links offered by the system.
- Finally, you can speed up the progress of the topic by indicating several keywords in the line under the background (any of them can be deleted by clicking on the slanting cross to the right of it) and clicking on the “Done” button.
How to create a poll in a group?
You can make a survey in a group on Odnoklassniki:
- By creating a new topic on the page and selecting the “Add poll” button in the information window.
- In the newly opened window, enter the question and answer options in the appropriate fields - there can be as many of them as the group creator or administrator wants. An unnecessary answer can be removed in the same way as tags under the topic by clicking on the slanting cross to the right of it.
- By checking the required checkbox, the owner of a public page can allow survey participants to check several options at once. In addition, using the “Other settings” link, it is easy to make the number of responses of other users available only to those who have already voted, and also to add anonymity to the survey - of course, within the framework of the Odnoklassniki privacy policy. After completing the settings, click on the “Save” button.
- Now the user can see what the survey looks like for page visitors.
- If you wish, you can add a picture to the beginning of the topic, and also include a music file in the accompaniment by returning to editing again and using the appropriate links.
- If the topic has been pinned to the group header, the survey will appear in its place. To vote, the user will only need to tick one or, if allowed by the author of the vote, several answers.
- In the new drop-down list, you need to select groups to distribute the survey. The topic will appear in the feed of each of the marked groups and, in accordance with the settings, will become available to visitors to the corresponding pages.
Important: if the survey was posted in a third-party group without the consent of the administrator, he can delete it. A similar point must be taken into account when promoting: it is better to negotiate with page owners in advance than to try to restore messages or look for new “donors” later.
Let's sum it up
Receiving money from a group in Odnoklassniki is much easier than in other low-profit projects. In addition, public or private pages can be used for non-commercial purposes to disseminate important or simply interesting information. In all cases, before creating a group, topic or survey, you must register on a social network by entering your phone number and creating a password.
Creating a group, as well as creating topics in it or conducting surveys, is free for the user. Just open a pop-up window, enter a name, select a background and attach a music file. The survey can be opened either in a new topic or in an existing one; allow users to select one or more answer options, as well as arrange anonymous or open voting, the administrator decides.