Asus router version RT-G32: model description, installation, configuration. Instructions for setting up wireless routers Asus RT-G32 C1, RT-NXX Login to the Asus rt g32 router
The asus rt g32 router is a “classic” representative of the budget “line” of routers: the cost of the device does not exceed $25 - $30, and the model is available almost everywhere.
Despite its rather “respectable” age (the model first appeared on the international market more than six years ago), the asus rt g32 router is still very popular with such well-known providers as Rostelecom, Ukrtelecom, Dom ru and TTK, as well as cellular operators communications (Beeline, MTS, etc.). Which is quite natural: the cheaper the model, the easier it is to sell it to a trusting client.
However, any network equipment in this price category has its own “baggage” of shortcomings. And the asus rt g32 router, despite the “renown” of the manufacturer, was no exception here: many reviews note the poor design of the model, frequent crashes and “freezing” of the modem during operation, as well. Therefore, when choosing, you should pay attention to more modern models.
However, router rt g32 can easily support a small home network with limited functionality. This article provides a brief overview of the router, as well as step-by-step instructions on how to install and configure the rt g32 wifi router yourself.
Router asus rt g32: functionality and technical specifications
WiFi access point rt g32 operates at a standard frequency of 2.4 GHz, and it is recommended for stable operation of the wireless network.
The security of information exchange here is ensured by the use of modern technologies: WEP, WPA and WPA2. At the same time, the nominal speed of receiving information via wi fi is only 150 Mbit/s - this is a fairly low figure compared to the same, where the maximum reaches 300 Mbit/s.
Asus rt g32 router: indicators

As usual, the indicator block of the asus rt g32 router is located on the front panel of the device and is limited to the “standard” set:
- - power indicator that lights up when the device is connected to the mains;
- - wi fi (WLAN) indicator, which lights up when a wireless connection to the asus rt g32 router is activated;
- - WAN indicator, responsible for “delivery” of the Internet to the router. In other words, if this indicator is not lit, then you have “no Internet” - perhaps the provider has limited access to the service or there is a problem with the line;
- - four LAN indicators that light up when a network cable is connected to the corresponding connector on the back of the modem.
Asus rt g32 router connectors
On the back of the Wi-Fi router asus rt g32 there are:
- - a RESET button “hidden” in the device’s body, which is necessary to reset the router to factory settings;
- - round DC connector for connecting the router power adapter;
- - a separately located WAN connector for connecting the Internet cable provided by the provider.
- - four identical LAN connectors for cable connection of external devices (we also talked about how in separate articles)
How to connect the Asus rt g32 router?
Authentication method - here feel free to choose WPA2-Personal (this is the most modern method of protecting data on a wireless network).
A WPA preshared key is a Wi-Fi password that protects your network from “free” WiFi lovers. It is recommended to set a complex unique password on the WiFi router asus rt g32, which will protect your router when someone tries to hack the network.
By the way, you can later change the password - this is also done in this section of the menu.
Setting up IP television on the asus rt g32 router is also carried out in “Advanced settings” in the WAN section, where you need to select the port to which the TV set-top box is connected and set a dynamic IP address for it


The RT-G32 router allows you to create up to four WiFi networks simultaneously. As with other Asus router models, the connection is configured through a web interface that can be opened in any browser. A large number of adjustable parameters and wireless network speeds of up to 150 Mbps make the Asus RT-G32 suitable not only for home but also for office use.
Login to router settings
The standard IP address where you can access the Asus RT-G32 control panel through a browser: 192.168.1.1. To authorize, you will need to specify the username and password of the router. By default this is admin/admin, but if someone has previously configured the router, they may have changed this information. In this case, it is recommended to confirm the new login and password with the person who set up the device.

Advice! If you are unable to find out the changed account settings, use a reset. This is done by long pressing the “Reset” button on the back of the router.
The control panel home page contains a menu, a quick network map, and access to quick changes to basic settings. Using them you can:
- Change SSID (WiFi name).
- Limit the maximum WiFi speed.
- Turn the radio module on or off.

Changing Internet settings on RT-G32
To configure the Internet, open the “WAN” tab in the left menu. At this stage, it is advisable to have access to information about your connection that is provided by your provider. Depending on the technology used, this may include the IP address, subnet mask, DNS server addresses, and account login information.
Select your WAN connection type from the first drop-down list. When using IPTV, mark the port to which the equipment that provides digital television is connected. It is recommended to leave the “Enable UPnP” option unchanged (set to “Yes”). It makes it easy to add new network clients.

To automatically connect to domain name servers, select the “Yes” option in the appropriate item. Below, enter the IP of the primary and backup DNS servers. Enter your account information if the connection type you are using requires it. The remaining settings of the Asus RT-G32 router for a specific provider can be clarified on the website of the company providing Internet access.

Pay attention! You can use the addresses of Google Public DNS or Yandex DNS services as DNS servers.
Training video: Some nuances of setting up the Asus RT-G32
Additional router settings
You can configure WiFi on the Asus RT-G32 router in the “Wireless Network” tab. In the “SSID” field, enter the desired name of the wireless network. The network can be made hidden by checking the “Hide SSID” checkbox. The optimal encryption method is “WPA2-Personal” protocol, “AES” type. The WiFi password is specified in the “WPA Pre-Shared Key” line.

to connect to the Smile network
First, you need to connect all cables to the appropriate connectors:
- Food.
- Incoming Ethernet cable from the provider (to the corresponding WAN port.)
- Ethernet cable from the network card to any LAN port on the router. (usually indicated by numbers.)
For Windows XP:
Go to the menu ![]() , .
, .
In the network connections window (Figure 1), right-click on “ " and select " Properties».

Figure 1. Network connections window in Windows XP.
In the window " Local Area Connection Properties"(Figure 2) select " Internet Protocol tcp/ipProperties».

Figure 2. Local network connection properties.
In the window " Properties of the Internet Protocol TCP/IP» (Figure 3) select:
- « »
- « »
and click the button OK»

Figure 3. TCP/IP protocol
For Windows 7:
Go to the menu
, ![]() ,
,  , .
, .
In the window " » (Figure 4) click ![]() .
.

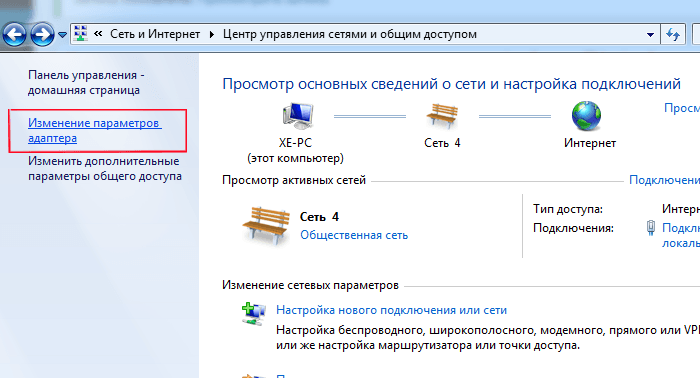
Figure 4. Network and Sharing Center window in Windows 7.
In the window " "(Figure 5) find " Local network connection", right-click on it and select " Properties».

Figure 5. Network Connections window in Windows 7
In the window " Local Area Connection Properties" (Fig. 6)) select the item " Internet Protocol Version 4 (TCP/IPv4)"(without unchecking the checkbox) and click on the " Properties».

Figure 6. Local network connection properties in Window 7.
In the window " Properties: Internet Protocol Version 4 (TCP/IPv4)"(Figure 7) select:
- « Obtain an IP address automatically»
- « Obtain DNS server address automatically»
and click the button OK»
Figure 7. TCP/IP protocol
To get to the router’s web interface, open your browser, enter the router’s IP address in the address bar (default http://192.168.1.1) and go to this address (Figure 8).
Figure 8. Browser address bar

Setup using the Installation Wizard
- You are taken to the Router Installation Wizard (Figure 10). Click " Next».

Figure 10. Installation Wizard
- Click the button Go to manual setup"(Figure 11).

Figure 11. Determining the connection type
- Select WAN connection type " PPPoE" (Figure 12) and click " Next».

Figure 12. Selecting the connection type manually
- Fill in the fields (Figure 13):
- Username - your login for accessing the Internet (issued by your service provider)
Click " Apply all settings».

Figure 13. Account setup
- Wait for the window with the message “ Done!"(Figure 14).

Figure 14. Performing saving parameters
- Wait until the Internet connection check is completed (Figure 15).

Figure 15. Checking Internet connection
- In the next window (Figure 16), fill in the fields:
- SSID – the name of the wireless network (you need to come up with it yourself, it will later help you distinguish your network from strangers)
- Network key – key for accessing the wireless network
Click the button Complete».

Figure 16. Wireless network setup
- Wait for the window with the message “ Done!"(Figure 17). Until now, do not turn off the power to the router under any circumstances!

Figure 17. Saving parameters
- Subsequently, the result of the setting will be displayed (Figure 18). Click " Going online» to start using the Internet.

Figure 18. Completing setup
Your Asus Internet router is configured for a pleasant experience on the Smile network!
Manually setting up Internet access
To manually configure Internet access:
- In the section " Additional settings» select the item « WAN"(Figure 19). For the parameter " WAN connection type» select value « PPPoE».

Figure 19. Manually setting up an Internet connection – Connection type
- Fill in the fields (Figure 20):
- Username – your login for accessing the Internet (issued by your service provider)
- Password – your password for accessing the Internet (issued by your service provider)
Click " Apply».

Figure 20. Manually setting up an Internet connection - Authentication
Manual wireless network setup
To manually configure a wireless network:
1. Log into the router’s web interface.
2. In the section " Additional settings» select the item « Wireless network"(Figure 21).
3. In the field " SSID"Indicate the name of the wireless network (you need to come up with it yourself; it will later help you distinguish your network from strangers).
4. For the parameter " Authentication method» select value « WPA-Auto-Personal».
5. For the parameter " WPA encryption» select value « TKIP+AES».
6. In the field " WPA Preshared Key» specify the key to access the wireless network.
7. Click " Apply».

Figure 21. Manual wireless network setup
Setting up the IPTV port
To configure the IPTV port:
- Log into the router's web interface.
- In the section " Additional settings» select the item « WAN" For the item " IPTV STB port selection" select the value corresponding to the port to which the STB is connected, and click " Apply"(Figure 22).

Figure 22. Configuring the IPTV port
Changing the password for the web interface
To increase the security of your Internet use, we recommend changing the password for accessing the router’s web interface. To do this:
1. In the section " Additional settings» select the item « Administration", tab " System"(Figure 23).
2. In the window that opens, you will need to specify “ New Password"(password that you will subsequently use to access the router's web interface) and " Re-enter your new password"(Accordingly, there you will need to re-enter a new password to access the router’s web interface).

Figure 23. Changing the password to access the router web interface
Magazine
You may also need data from the router log. To obtain this information, go to the section " Additional settings", paragraph " System log", tab " General Journal"(Figure 24).

Figure 24. Router system log
Asus products are widely known throughout the world. The manufacturer supplies the market with a wide variety of computer equipment, including wireless WiFi routers. In this article, we will look at what needs to be done to configure the Asus RT-G32 router to access the Internet, and we will give an example of setting up a wireless network.
If you just purchased a brand new router, you will first need to connect the necessary cables to it. After unpacking the device from the box, you will have in your hands a power supply and a short network cable (patchcourt). Everything is clear with the power supply, but the cable will need to be connected to one of the yellow sockets on the back of the router (LAN1, LAN2, etc.). The other end of the wire connects to the network card on your computer or laptop. This is done so that we can get into the modem settings.
It is not always necessary to use a cable. You can also connect to the router via a WiFi connection, but at the first stage it is better not to do this, unless, of course, it is possible to connect the computer to the device via a cable.
As you might have guessed, the blue socket labeled “WAN” is where an “Internet cable” is connected. This is the cable that we deliver to your home or office from your provider.
After the cables have been connected, it is recommended to reset the router settings to factory settings. To do this, take a thin object and, placing it in the hole marked “Reset”, press the button and hold it for 7-8 seconds. Typically, all indicators light up and then go out - this is a signal that the reset was successful.
Now we can continue.
Login to the router web interface
Like most modern communication devices, the Asus RT-G32 router has a web interface. To get inside, just use any Internet explorer that you have - Opera, Internet Explorer or any other.
You will need to enter the router's IP address into the address bar of your browser. If you reset the device, the IP will look like “192.168.1.1”. We write it into the Internet Explorer and press the go button.
If you cannot log in to this address, this may be due to one of two reasons:
- Your device has a different address. Typically, if the reset is successful, the router will return the IP address to its factory default value. You can try repeating the reset procedure again.
- Your computer's network settings do not match the router's settings. Here you will need to reconfigure the IP address values of your LAN connection. This is done differently for each operating system.
The web interface is usually protected by a login and password - you will need to enter them. By default, both of these values are admin. Write your username and password in the appropriate fields and click the login button.
If everything goes well, you will be taken to the Asus RT-G32 web interface. Here the router will prompt you to make the settings automatically, but it’s better to do it yourself. To do this, click the “Home Page” button at the bottom of the page. 
To connect to the global network, the Asus RT-G32 router can use several types (technologies) of connection
You can only find out which one is needed in your case from your provider. The information should also be specified in the contract with your Internet provider.
After you have determined the connection type, go to the WAN web interface. Here, in the “WAN connection type” drop-down list, you will need to select one of the communication technologies and configure it. Let's look at each one.
Dynamic IP
This communication technology does not require any configuration. Just leave all settings as they are and click “Accept”. However, let's say in advance that this type of connection is not used by almost any Internet service provider. 
Static IP
This type of communication involves entering network addresses, which are issued by the Internet provider to each client individually. As you can see, here you need to enter values in the 5 fields below (see the picture below). Do this by entering in each field the address that corresponds to the address issued by your provider, and then click “Accept.” 
PPPoE
This technology involves the use of authentication data (login, password), also issued by Internet providers. In addition, some providers additionally provide clients with static IP addresses. If you have all the data on hand, fill out the fields according to them:
- To begin, enter your authentication information in the appropriate fields in the “Account Settings” section.
- If your provider uses static addresses, move the switch in the “IP Address Settings” section to Yes and fill in the fields according to the data you provided.
- Enter – 1472 as the MTU value.
 Click "Accept".
PPTP
The steps for setting up the PPTP connection type are exactly the same as in the previous case, with only one exception. Here you will additionally need to enter the VPN address in the “Heart-Beat Server” field. This address must also be provided by your Internet service provider in the form of a regular IP address (or, in some cases, a domain name). Fill out everything in accordance with the picture below (indicating your values, of course) and click “Accept”. 
Immediately after you have set the settings for accessing the global network, all that remains is to configure Wi-Fi
Go to the modem’s web interface to the “Wireless Network” tab. Here you need to set values for the following fields:
- SSID is essentially the name of the network that is displayed on your phone or computer when searching for available WiFi nearby. Enter here, for example, “Moy_vayfay” or something similar.
- Just below there is a field “Hide SSID”. If you check the "Yes" box, your network name will not appear when searching for networks - in this case, you will need to enter it manually in the settings of your communication device. It is better to leave a tick on the “No” option.
- From the lists marked “2” in the figure below, select the appropriate values.
- The lower field is intended to set a password that will protect your Wi-Fi network. Here you should enter a value that is at least 8 characters long and, preferably, contains both letters and numbers.
 After completing all procedures, you will need to reboot the router, which can be done by clicking on the corresponding button.
ASUS is a well-established manufacturer of electronics with good performance, including modems for Internet access. But any device of this type must be configured to the parameters of the provider with whom the contract for the provision of communication services has been concluded.
This instruction will give you the answer to the question of how to configure the asus rt g32 router, while it is worth remembering that the configuration algorithm and interface of devices from the same supplier are very similar, so the article will be useful to all buyers of ASUS modems with Wi-Fi support.
Preparing for setup
Technical preparation of the router for configuration is carried out in several stages:
- Connect the power supply to the Asus rt-g32 and turn it on to the power supply.
- Connect the Ethernet cable provided by your provider to the modem connector labeled “WAN”.
- Connect the router port labeled “LAN1” to the computer’s network card using an Ethernet cable, which is included in the Wi-Fi modem kit.
- Reset the Asus RT g32 to factory settings by pressing and holding the “Reset” button recessed in the case for ten seconds.
Setting up your computer
Often the characteristics of a computer's network card are manually configured for other connections. To work with the Asus RT g32 Wi-Fi router, you need to configure the card:
1. Open the network settings section of the OS. For example, for Windows 7 you need to open the settings window shown in the following figure (located in the control panel), where you click on the highlighted link.
2. Go to the connection properties by right-clicking on its icon and selecting the appropriate item in the menu that appears.

3. Open “Properties” of the item indicated in the following figure:

4. Set the protocol characteristics as shown in the figure:

We repeat the procedure for the remaining connections, if any.
Setting up the router
To configure the Asus RT-g32 according to the settings of your provider, follow the steps of the following instructions:
1. Launch any browser, enter the address 192.168.1.1 and go to it.
2. In the loading authorization dialog, enter “admin” in both fields and click on “Submit”

3. Click on the “Go to Home Page” button

4. The software shell of the Asus RT g32 Wi-Fi router supports Russian, select it in the “Language” field.

5. To configure access options for the global network, click on the “WAN” main menu item.
6. Find out your connection type from your telecom operator.

7. If your provider provides Internet using dynamic IP technology, then nothing needs to be changed on the “WAN” page. Click on the "Accept" button.
8. If the Internet is provided using static IP technology, then in the “WAN connection type” item, select the appropriate type and fill in all the form fields with the data received from the provider and click on “Accept”.

9. When selecting the PPPoE connection type, specify receiving an IP address automatically or fill in the address field if it was provided by your Internet provider. Z Fill in the fields in the “Account and connection settings” section with the data specified in the contract for the provision of communication services, and in the MTU field enter the value 1472 and click on “Accept”.


11. Apply the changes and configure the wifi module for a wireless connection. If this option is not needed, reboot the modem and use the Internet.
Wi-Fi setup
To configure the characteristics of wireless access to the global network, open the “Wireless Network” tab of the main menu. Where you will set the following parameters:
- In the “SSID” field, enter the name of the Wi-Fi network displayed on subscriber devices. It can be arbitrary, but must consist only of numbers, symbols and letters of the Latin alphabet.
- Enable the “Hide SSID” option if you want to use this method of protecting your wifi network from unauthorized access. When activated, the setting hides your network from subscribers, and you can connect to it only by knowing its exact name.
- In the “Authentication Method” line, set “WPA-Personal”. And in the “WPA encryption” line, select “TKIP”. These are the most well-established and widely used methods of network security.
- The “WPA Pre-Shared Key” line contains the password that users must enter when logging into your wifi network. The length of the code combination must be at least eight characters; any characters can be used.
- To fix the settings, click “Apply”.

This completes the setup of the Asus RT g32, all that remains is to reboot it and use the Internet, both via a wired interface and via Wi-Fi.
Found a typo? Select the text and press Ctrl + Enter