Where are the Windows 8 folder options. Always show icons, not thumbnails
These are regular folders that have the Hidden attribute set. This attribute hides folders from the Windows interface. Using this mechanism, it is very convenient to hide folders that you do not plan to use. This way, you can greatly simplify working with folders and files.
However, in some cases, hidden folders can be quite a hassle, especially if you don't know how to open them. In this article we will talk about how to open hidden folders in Windows 8.
Working with hidden folders is practically no different from what it was in previous versions of Windows. There are two ways to open a hidden folder in Windows 8: by entering the folder name or by turning on hidden folders.
Method #1: Simply enter the name of the hidden folder.
If you know which folder the hidden folder is in and you know its name, then in order to open it you do not have to turn on the display of hidden folders. All you have to do is open the folder that contains the hidden folder you want and enter the name of the hidden folder in the address bar.
After you have entered the name of the hidden folder, press enter and your folder will open. A very simple and very fast way to open a hidden folder.
Method number 2. Turn on the display of hidden folders and files.
But, if you do not know the exact name of the folder, then the previous method of opening hidden folders will not work for you. In this case, you need to enable the display of hidden folders. Let's consider this method in more detail.
Open any folder window, such as My Computer, and go to the View tab.
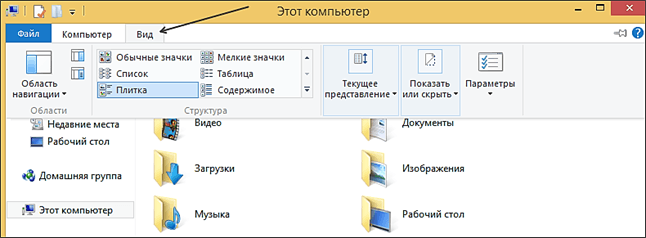
On the “View” tab, click on the “Options” button. This button is located on the right side of the toolbar.

After this, the “Folder Options” window should open in front of you. Here you can configure many parameters related to the Windows 8 interface and folder display.

It should be noted that the Folder Options window can be opened in other ways. For example, through – Designs and personalization – Folder options. In addition, Windows 8 users can use the search. To do this, just open the start screen and enter “Folder Options”, after which the operating system will prompt you to open this window.
To enable the display of hidden folders in Windows 8, go to the “View” tab in the Folder Options window. Here in the list of parameters you need to find the “Hidden Folders” section and enable the “ ” function.
View permissions
Assigning, viewing and changing permissions is done on the tab Safety dialog box Properties. To call it, you need to right-click on the file or folder and select from the context menu Properties

Also dialog box Properties can be called by pressing the key Alt on the keyboard and double-click with the left mouse button on the desired file or folder.
In the dialog box that opens Properties select a tab Safety

On the tab Safety You can see which users and groups have access and what permissions they are granted. Information about additional access options (including special permissions) can be obtained by clicking the button Additionally

It may happen that the tab Safety in the window Properties is not displayed for you. Make sure the file or folder is located on an NTFS partition.
Assigning file permissions
Setting permissions for a file is done as follows:
1 . Right-click on the desired file and select from the context menu Properties Safety.
2 . Next, look at the list of users and user groups at the top of the tab that have already been assigned permissions for this file. You can either select a user and change the permissions set for that user, or add or completely remove a user (or group of users). In any case, you need to press the button Change..., and then select the desired action: buttons Add... And Delete.

3 . When adding a user after clicking the button Add a dialog box will appear. In it, you can either immediately enter the user (or group) name in the field Enter the names of the selected objects- but you need to enter it correctly, or use the search tool by clicking on the button Additionally

In the first case (when manually entering a name), you will need to click on the button Check names to check that the names entered are correct. By the way, the type of objects entered (User, User Group, Built-in Security Principals) is selected by pressing the button Object Types.
In the second case, when conducting a search, another dialog box will appear in front of us, in which we need to immediately click on the button Search. After this, a list of all groups and users on the computer will appear at the bottom of the window. All that remains is to select the necessary ones.

4 . When you have finished specifying user and group names, close the window Select: Users or Groups by pressing a button OK
5 . The process of setting permissions is as follows:On the tab Safety in the area Groups or Users Permissions, by checking the boxes you assign or deny this or that standard resolution. To set the resolution, you need to check the box next to it in the column Allow, and to deny this permission - check the box in the column Prohibit. A total of 5 standard resolutions are available - Full access, Change, Read and Execute, Reading, Record.
6 . If you want to assign permissions in more detail, including special permissions, then you need to click on the button Additionally on the tab Safety.
When setting permissions, pay attention to two important things. First, setting or denying a permission may automatically affect other permissions. For example, by setting the Full Control permission, you will automatically set all other possible permissions.
The second thing you need to pay attention to is that the absence of any permission (the checkbox is not in any column Allow not in the column Prohibit) is not equivalent to denying this permission (the checkbox is in the column Prohibit).
If the permission is not specified, it is typically inherited from the parent folder that contains the file. And in this case, unpleasant situations may arise. For example, access to a folder is granted, but access to a file should be denied. So, if this prohibition is not explicitly set, then the permission will be inherited from the folder - that is, access will be allowed.
If you want more “fine” permission settings on the tab Safety click on the button Additionally, a dialog box will open in front of you. This dialog box has several tabs.

On the tab Permissions A list of access controls for the file is displayed. This specifies the names of users and groups that have permissions for the file, as well as the permissions themselves. It is worth paying attention to the column Inherited from. In it you can see from which object this file inherited permission for this specific user or group. Typically, files inherit permissions from the parent folder in which they are located.
Access to setting special permissions can be accessed by clicking on the button Change on the tab Permissions

After this a window will appear Permission element for " ", in which you need to click on

In the next dialog box Permission element for " ", by checking/unchecking the boxes you can set or cancel any special permissions for the file.

Assigning folder permissions
The sequence of actions for assigning and changing permissions for a folder repeats the above-described sequence for files. However, there are small additional settings that are unique to folders, as containers that contain other objects. For clarity, here is a complete description of the procedure for assigning permissions to a folder:
1 . Select the desired folder and right-click on it. Then in the context menu select Properties, and in the dialog box that appears, go to the tab Safety.Next, look at the list of users and user groups at the top of the tab that have already been assigned permissions for this folder. You can either select a user and change the permissions set for that user, or add or completely remove a user (or group of users). The buttons are designed for this purpose Add And Delete. These steps are the same as those for setting file permissions. The only thing to note is that the list of standard permissions for folders is slightly different from the list of standard permissions for files.
2 . The process of setting permissions is as follows:On the tab Safety in the area Groups or Users select a user or group name, and below, in the area Permissions, by checking the boxes you assign or deny this or that standard resolution. If you want to assign permissions in more detail, including special ones, then you need to click on the button Additionally on the tab Safety.
You just have to remember that folder permissions are transferred to the objects nested in them - files and folders. How to prohibit inheritance of permissions is described below in this article.
To proceed to setting up special permissions, just as in the case of files, you need to click on the button Additionally. Next in the dialog box that appears Additional security options you will see a list of folder access controls.
To change permissions for a user or group, click the button Change permissions

Next, select the entry we need, if the button Change is not available, then you will not be able to change additional permissions because the window Permission element, the controls will not be active; to make them active, press the button Disabling inheritance

In the dialog box that appears Block inheritance press

After this button Change became available

Next, select the entry we need and press the button Change, or double-click with the left mouse button on the entry we need, a window will open Permission element, where the controls will be active and click on it Show additional permissions

Now you can set special permissions for a folder, as well as specify their scope.

The scope of the folder's special permissions is set in the drop-down list Applies to. The following options are possible:
Only for this folder.
For this folder, its subfolders and files.
For this folder and its subfolders.
For this folder and its files.
Only for subfolders and files.
Only for subfolders.
For files only.

If DO NOT install checkbox Apply these permissions to objects and containers only within that container, then the permissions you set will apply not only to subfolders, but also to subfolders within them, and so on to all objects located lower in the tree.
Note: A folder tree (or directory tree) is an image that is commonly used to visually represent a folder structure. It is in the form of a tree structure that folders are displayed in the left section of Explorer.
If the buttons Change permissions And Change are not available and the controls in the window Permission element are not active, just like in the example above, press the button Disabling inheritance, in the dialog box that appears Block inheritance press Convert inherited permissions to explicit permissions on this object. After this button Change controls in the window will also be available Permission element will become active, where you can set additional permissions
If you want to add a user or group of users and assign them permissions, click the button Add


In the next window, click the button Search and at the bottom of the window in the search results, select the user or group for which you want to set or change permissions, click the button OK

Press the button again OK


You can now set additional permissions for the added user or group.

Permission inheritance
In Windows 8, Windows 8.1, subfolders and files can inherit permissions from the parent folder. This is what happens by default. In this case, changes in permissions of the parent folder are instantly transmitted to subfolders and files.
However, if you want to set subfiles and folders to have different permissions than the parent folder, you can disable permission inheritance. In this case, two options are possible:
You want to uninherit parent folder permissions for all subfiles and folders.
You want to uninherit parent folder permissions for only some subfiles and/or folders.
In the first case you should go to the tab Safety for this folder, and then click on the button Additionally. Next, go to the mode of editing permissions for a user or group and in the list Applies to indicate Only for this folder.
In the second case, you need to go to the tab Safety for this specific file or folder, click on the button Additionally and in the window that appears Additional security options press the button Change permissions
Folder properties allow you to change the basic parameters of both the current directory and all folders in the system. The basic settings are no different in Windows 7 and 10. But launching the settings themselves has some features in each version of the system.
IN Windows 7 you need to open any directory and select the button in the upper left corner Arrange. In the context menu, look for and click on “ folder and search options" You can make it simpler and just press the Alt key.
After this, a panel will appear at the top of the window, where you need to click on Folder Options.
In version 10 systems everything happens a little simpler. Here the menu is not hidden and just go to “ View" and find the button Options.
After clicking on this button, the menu of interest to us will open with folder settings.
How to change properties and basic settings
Let's look at the basic folder options and what they mean. After we have completed the above steps in front of us, a settings window will open. 
General section There is no need to describe it specifically. Everything is clear here. It is possible to open each directory in a new window, as well as change the click action. As a standard, you can select an object with one click and launch it with a double click. By changing these settings, you can launch files with a single click.
Next tab " View» allows you to make more detailed settings.


The ribbon interface, which first appeared in Microsoft Office 2007, has now become the property of Explorer. This solution, according to the developers, significantly simplifies access to Explorer options and makes its configuration more convenient and faster. Explorer itself, in its new form, has a fairly wide range of functions and settings, which can be easily verified by clicking on the small improvised arrow in the upper right corner of the screen or pressing the key combination Ctrl + F1. Take, for example, the folder properties settings. Many novice users do not attach much importance to them and are completely in vain.
But thanks to these settings, you can not only improve the appearance of the shell, but also provide a higher level of security and even slightly speed up the operation of the system as a whole.

How to Access Folder Properties Settings in Windows 8
There are several ways to access folder properties settings in the operating system. We have already described the first of them. Open the ribbon, switch to the “View” tab and click on the “Options” icon, after which the corresponding window will open.
The second method is no less simple. Use Windows 8 search. Switch to the “Options” module and enter the command “folder options” in the search bar - the search results will be displayed on the left side of the screen (Changing search options for files and folders). Finally, you can open the Control Panel and find the “Folder Options” option there.

Useful folder properties settings
So, now let's see what can and should be changed in the folder properties settings. The optional folder properties window has three tabs - General, View and Search. In principle, you don’t need to change anything in the “General” section. The only thing we can recommend is to check the box “Automatically expand to current folder”.
This setting will make Explorer display a more complete tree structure of your folders. The settings of the third tab “Search” can also be left unchanged. The “View” tab has many options and it’s worth taking a moment to look at them. Let's look at some of them.

Restore previous folder windows upon login.
Always display icons rather than thumbnails.

Launch windows with folders in a separate process.
Options for displaying drive letters, view handlers, file icons, size information, etc. It is not recommended to disable them unless the information they provide, such as file size, is not particularly meaningful to the user.

Hide empty drives in the Computer folder.
Use checkboxes to select items.

Hide extensions for registered file types.
As for the settings “Hide protected system files” and “Do not show hidden files, folders and drives”, they must be enabled. This is necessary for your own. Accidentally deleting or changing the contents of such folders can have serious consequences for the operating system.
Conclusion
Folder properties settings are not critical. You can freely experiment with them without fear for the performance of the operating system. The only exceptions are the options we described last. By changing folder properties settings, you can significantly improve the basic functionality of Windows 8 Explorer and make your work on the computer more convenient and productive.
Hidden files and folders are those objects in the system that are not visible to the user by default. They are hidden for security so that the user does not inadvertently change or delete them. Removing or changing them may cause your computer to malfunction or even stop working. However, sometimes a user who is already quite familiar with the computer system needs to see these hidden files and folders. For example, in order to remove unnecessary temporary files from the AppData folder. Sometimes these files occupy a huge amount of hard disk space, bringing no benefit, but only slowing down the system.
Procedure
So how can you make hidden files and folders visible in the Windows 8 operating system?
- Click the right mouse button anywhere on the desktop. From the list that appears, select “Folder Options”;
- Go to the “View” tab in the “Folder Options” window that opens. In the “Advanced options” submenu, find the “Hidden files and folders” item;
- Select "Show hidden files, folders and drives". Click on "OK".

After these steps, hidden files and folders will be visible. You can check this in the same AppData folder:
- Open drive "C". Go to the Users folder;
- Open the folder with your account name;
In the specified location, among others, there will be an AppData folder. This means that hidden folders and files have become visible.

Please note
By the way, in the “Folder Options” window, the user can configure other parameters in a convenient way. And if you need to return all the parameters to their original form, you just need to click on “Restore default values”.
It should be noted that you need to be careful with hidden folders and files. If an important system file is accidentally deleted, this will lead to operational errors, and as a result, the entire system may crash. Of course, this is very undesirable for the user. After all, in the event of a permanent disruption, you will have to reinstall the operating system. And this will entail the loss of all user files - videos, music, photos and documents, installed games and programs, and all personal settings.
And if the system file has already been deleted, but the work has not yet stopped, all that remains is to return the system to its previous state, when it was working properly. To do this, go to the control panel. From there, go to the “System” menu, and then “System Protection”.


Click on the “Restore” item. The System Restore window will open.


Of course, it is necessary that the corresponding function is enabled, otherwise there will be no restore points. To enable system protection, you need to select the main drive (usually C) in the same “System Protection” window, click “Configure”, and select “Enable system protection”. In this case, recovery points will be created automatically.
.jpg)
You can create it yourself by clicking the “Create...” item in the “System Protection” tab. This should be done in advance, when the system is stable.