How to create a theme for Windows? How to create a theme Create themes for windows 7 yourself
Sometimes even a simple change of environment can help take your mind off a drab office day and lift your spirits. If we talk about the default wallpaper in Windows 7, then even they sometimes get boring, because you want variety on your desktop. We can say that while working, your attention is completely focused on business, and changing covers is the job of schoolchildren and slackers, but this is far from the case. Believe me, even changing the view of your desktop can lift your mood, especially if, for example, your favorite character from a TV series or movie is on the main screen of your PC.
I have repeatedly met people who have had the same blue picture with the Windows logo for more than one year. To be honest, they haven't even changed the theme since installing the system. They explained this by saying that they had no need to change the wallpaper, since everything was fine as it was.
Before creating your own slideshow for the home screen, let's look at the built-in themes in Windows 7. First, we'll look at the ready-made packages, then we'll try to repackage them, and then we'll start creating our own theme from several photos.
Select a topic from the suggested ones
Microsoft cares about users, the company has prepared several templates that include great photos that you can put on your desktop right now. To view a list of ready-made themes, right-click on the desktop, and then click on the item labeled “Personalization”. Alternative method: start, control panel and select the same section as when switching from the main screen.

So, now you can see the themes built into Windows 7 and you can also select one of them by left clicking on any template.

In addition, you can also download themes online from the Microsoft website. To do this, follow the link “Other topics on the Internet”. There you can select the desired category and download the design you like.
We make repacks from ready-made themes
We looked at ready-made slideshows for your desktop background. Now let’s combine several images from different templates into one, thereby getting a completely new pack of images that change after a certain time on the background of your favorite desktop.

To go to setting up themes, click on “Desktop Background” in the bottom menu. Here we see which photos you can choose to display on your home screen.

So, you can put checkboxes on those images that you want to see on your desktop. I'll select one from each theme, then choose the position of the picture and the interval at which they will alternate. To complete the procedure, click “Save changes”, after which you will be taken to the main personalization settings page and will see your pack of pictures at the top.

To change the name of a theme, right-click on it and click “Save”, then a window will pop up in which you will need to enter its name. This completes the repacking process.
Life in a new color: creating your own theme

To start creating your own slideshow from photos or video game wallpapers, go back to the Desktop Background section and click Browse to select the folder containing the images. For my convenience, I created a folder with pictures on the desktop and placed screenshots from games there, they just fit the size of my screen.

After you have specified the location path for your photos, you can choose which ones will be displayed on the screen: check the boxes for the ones you need, then select the interval and save the changes.
Greetings, dear readers.
In the latest versions of Windows, developers have provided users with ample opportunities to customize the appearance of the operating system. Now here you can not only set wallpaper and select a screensaver. Microsoft has provided an option to select the color of windows and even set a slide show as a background image. Today I will tell you how to create your own theme for Windows 7 and generally introduce you to the Personalization tool.
In previous versions of Microsoft's operating system, users could use standard features to change the wallpaper, select the screensaver and window color. True, the last two points had relatively limited possibilities. And some programs allowed them to be expanded.
In the new version of the OS, it is possible not only to set the desired overall shade, but even to set automatic selection, which will help set the color of the windows depending on the desktop background.

In the future, if you suddenly want to change some parts of the overall appearance, the old configuration will not be saved, and then you will need to select everything again. To avoid this, you just need to save the settings.
Personalization menu options( )
Creating a theme involves developing your own look and feel from scratch, making some adjustments to existing sets, or installing new ones. In any case, the resulting data can be saved and restored at any time if desired.
There are several options offered here. First - " My themes", where you can select saved options. We will return to it later.
In addition, there are already ready-made settings “ Aero" They are translucent panels with full sets of backgrounds. The latter change independently after a certain time.
There is also " high contrast and simplified" Such options are suitable if you use weak equipment. This will reduce the load and increase efficiency.
Creation( )
Windows 7 Ultimate also allows you to change the color of windows - to do this you need to select the appropriate menu from below. For complete personalization, we also install system sounds and a screensaver. Now your computer will definitely be unique.
Download( )
But it’s not always worth the time to spend a long time comparing background images and shades of the main elements of the operating system. There is an option to select the appropriate combination in “ world wide web" To do this, everything is in the same menu " Personalization"You need to press "". An official page will open where you can select a variety of settings. Choose the ones you like and click " Download».

Software( )
You can also customize the appearance of the Microsoft operating system using the Windows Style Builder program. The application can be safely called unique of its kind. It is the only one in which it is possible to create new or change existing visual styles. To change individual elements, you may need knowledge of Adobe Photoshop. Here you can choose not only the background or shade, but also many other OS elements.

Despite the fact that the tool has extensive capabilities for customizing the appearance of Windows, experts still do not recommend changing much. After all, the more innovations are introduced, the more often errors may occur. And, therefore, the operating system will fail faster. The solution will be a complete reinstallation.
Another similar tool is UltraUX Theme Patcher. The utility also allows you to customize the appearance of the OS in detail, although it has fewer features than the previous one.
All sections of the site site
What is a theme + customize Aero for Windows 7
Customizing the Windows 7 Theme
What is a theme?
A theme is an amalgamation of computer images, colors, and sounds.
It includes a desktop background, splash screen, window border color, and sound scheme.
Some themes may also contain desktop icons and mouse pointers. Windows comes with several.
standard themes
You can choose the Aero theme to customize your computer, the Windows 7 Simplified theme if your computer is running slowly, or the High Contrast theme to improve the visibility of elements on your screen.
Click a theme to apply it to your desktop.
The theme contains desktop background, screen saver, color
windows and sounds.
Open the "Personalization" section. To do this, click the Start button and select Control Panel. In the search box, type personalization and then click Personalization.
You can also change the images, colors and sounds individually to create a customized theme. See below for more information
Creating a Windows Theme
You can change individual parts of a theme (images, colors, and sounds), and then save the modified theme for your own use or to share with other users.
Changing Theme Components:
2. Click the theme you want to change to apply it to your desktop.
3. Do one or more of the following:
3.1. To change the background, click Desktop Background, select the check box for the image you want to use, and then click Save Changes.
3.2. To change the color of window borders, click Window Color, click the color you want to use, and then click Save Changes.
3.3. To change sounds for a theme, click Sounds, select an item from the Sound Schemes list, and then click OK.
3.4. To add or edit a screensaver, click Screensaver, select the Screensaver list item, change any options you want, and then click OK.
The modified theme will appear in the My Themes section as an unsaved theme. Saving the modified theme for your own use only
1. Open the “Personalization” section. To do this, click the Start button and select Control Panel. In the search box, type personalization and then click Personalization.
===================
 ================
To save a modified theme to share with other users:
To share a modified theme, follow these steps:
To distribute the topic you can use
email, network or external hard drive.
The modified theme will appear in the My Themes section as an unsaved theme. Saving the modified theme for your own use only
2. Click the modified theme to apply it to your desktop.
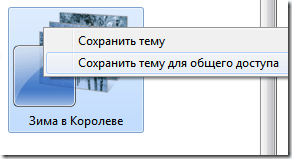
3. Right-click the theme, and then select Save Theme for Sharing.Customize the Windows 7 Theme
What is a theme | configure Aero in Win7 create a theme)
Windows 7 has a very beautiful mode for changing desktop wallpaper in slideshow mode. However, after a few months, I got bored with the standard themes, just as I got bored with . And I was puzzled by creating my own Windows 7 theme, with my own photos, colors, etc. And everything turned out to be much simpler than you might think at first.
The themes themselves are stored in a file with the extension “.themepack”, which is a regular cab archive. Actually, here is a description of its structure:
Of course, it was possible to generate this file yourself, but I was somehow lazy, and I decided to look for a simpler way, for example, using some program. But it turned out that Windows 7 itself can create these files. Below I provide step-by-step instructions on how to do this.
1. Preparing photos for a future Windows 7 theme
Select the necessary photos: they must have a resolution no less than the resolution of your screen, for example, 1280 x 1024. If the photo size is smaller, the photo will begin to “stretch” and “blur,” which is very ugly. Moreover, it’s very good to first add sharpening photos using a graphic editor (Photoshop or a free one) - it looks very impressive.
Copy all the photos into a separate folder in "My Pictures" so that they will be easier to select in the next step. If the order in which photos are displayed is important to you, rename them so that they appear in the order you want when sorted by file name.
2. Specifying Slideshow Photos in Windows 7 Theme
Right-click on an empty space on your desktop and select the “Personalization” menu item
Click on "Desktop Background"

Specify the location of your photos and tag them:

Specify the mode for changing photos:

3. Saving the theme in a .themepack file
But now that’s really all! The resulting file can be published somewhere on the Internet and enjoy its downloads, which can be monitored using Google Analytics, but that’s a completely different story...
Many who have installed Windows 7 cannot get enough of the Aero interface. How to make your own theme in Windows 7?
Everything is very simple - I would even say intuitive, since I did it myself 3 minutes after I set out to make my own theme.
To make it clearer, I will make instructions in pictures; I think the fact that I speak English in Windows will not hurt anyone. In other languages everything is similar.
1. Right-click on the desktop and select Personalize.


3. A background selection window will open. Uncheck unnecessary photos. And if necessary, use the Browse button to select the folder with the photos that you want to add to the theme. It is optimal that the photos have a resolution of at least 1024 by 768. Jpeg format. Photos from 5-8. This is if you are going to post the topic on the Internet. If you are making a Windows 7 theme for yourself, then do it as you please. At the bottom, don’t forget about the checkbox - display options: randomly or sequentially. You can also select the location of the background image - the default is usually the optimal value (stretch the image).

4. Next, save changes. You will again see the window from step 2. Select Windows color - this is essentially the theme color. You can choose a color from those suggested or make your own shade. Plus choose your transparency.

5. Next, save changes. You will again see the window from step 2. Select Sounds. I won’t go into details on how to make my own sound scheme. You can select from the suggested ones in the drop-down list.

6. You can choose a screensaver for the theme, but I don’t think it’s necessary to choose it at all, except perhaps for a black screen. Therefore, we will safely omit the Screen Saver item.
7. Next we will see that the theme is already in the My Themes section and it is written that it is not saved (Unsaved Theme). Right-click on it and select from the drop-down list: the first item Save theme, if we just want to save it on our computer (just enter a name). Or select: second item Save Theme for Sharing to save the theme to a file.
