Bios does not find bootable USB flash drive. What to do if the BIOS does not see the bootable USB flash drive
Every user is certainly faced with the need to reinstall the operating system on their computer or laptop. Recently, it is more rational to carry out such an installation using a regular flash drive, making it bootable.
This installation is fast and reliable, and creating bootable media is now easier than ever. But sometimes the user may encounter one problem that prevents him from performing a normal installation of the system - BIOS does not recognize bootable USB flash drive.
When connected to a computer device, it turns out that the flash drive is simply not detected by it, as if it doesn’t exist. Even after entering the BIOS (UEFI), the user does not find the drive in the Boot Menu. Below we will explain why the PC does not see the boot drive in the BIOS, how to correct the situation and make it visible.
Why is the bootable USB flash drive not visible in the BIOS?
The main reason why a bootable flash drive is not visible in the BIOS is a discrepancy between the boot modes specified in the BIOS and those supported by the drive itself. Why is this happening? Because modern computers have 2 boot modes: Legacy and UEFI. On older devices there was no such choice. So, only one of these modes is enabled in the device.
If the UEFI mode is set, then the drive on which the system image for Legacy mode is written will not be displayed in the BIOS. Accordingly, you won’t be able to select it as a boot one. In this mode, images for Windows 7 systems are usually recorded. If Windows is installed, then, as a rule, there are no problems.
What to do to make the BIOS see the bootable USB flash drive
2 options for solving the problem.
In a situation where the BIOS does not see the bootable USB flash drive, you can do one of the following two actions:
- In the BIOS you need to disable support for the second mode, which will not be used. After entering the BIOS, go to the Boot tab and simply set the mode you need to the value "Enabled". Sometimes this item is not easy to find. For example, it might look like choosing an operating system. In this case, the proposed options may be:
- Booting Windows 8 or 10 systems for UEFI mode.
- Booting another system (Other OS) also for Legacy mode.

If you are using a bootable USB flash drive designed only to boot in Legacy mode, you must disable Secure Boot in the BIOS. To do this, go to the field "Secure Boot" indicate value "Disabled". On some laptops and PCs, you only need to select Windows 7 to disable Secure Boot.
To find out whether Secure Boot is enabled on Windows 10 or 8 systems, just press the Windows + R combination on your keyboard, and then enter the expression in the line "msinfo32". After pressing "Enter", information about the system installed on your computer will be displayed, where you can find an item displaying the status of your secure boot. 
- Rewrite the data onto the flash drive again, choosing a different boot mode. This option is only possible for new images created recently. If you are recording an image that is a year old or older, it will only support Legacy mode.
If the recorded image is supported for both modes, it is not necessary to change the BIOS settings. It is enough to rewrite the system image. However, please note that to record images of Windows 7 and XP, you will need to disable Secure Boot.
It is very easy to create a bootable USB flash drive in the Rufus program. Before you start recording data, you will be able to select which boot mode the drive will be written to. The default (for most cases) is MBR mode for UEFI and Legacy. But you can choose MBR with UEFI or GPT with UEFI mode.
Important note! Many users do not understand one important point. For a flash drive to be visible in the BIOS, it must be bootable. That is, it is not enough to simply write an image of a system onto a USB drive and then install the system from it. You just need to create a bootable drive using one of the special programs.
You might be interested in how to use a USB drive to increase your computer's RAM ().
Using these tips, you can easily install any operating system on your device using a bootable USB flash drive.
Advances in technology have made it possible to significantly increase the capacity of flash drives. During this time, CDs completely disappeared from our lives, even Microsoft began distributing Windows 10 on flash drives. But what to do if the BIOS does not see the bootable USB flash drive that contains the software you installed.
Causes and solutions
There are not so many reasons, they are almost all related to the BIOS settings.
Important! First, you should make sure that the flash drive is working. By connecting it to another computer or laptop, check if it is displayed.
Incorrect image recording
The installation flash drive is created using special programs; it is not enough to simply upload the file to the drive, it must be written down correctly.
If you want to burn an image of Windows 7, then use a proprietary Microsoft utility.
For other versions of Windows and other programs, it is better to use UltraISO.

BIOS settings
What to do if the flash drive is written correctly, but loading from it does not occur? Most likely the problem is in the BIOS settings.
Device startup order
Advice! Connect the drive to a USB port before performing the following steps. This will make it easier to detect.

Download mode
The second reason may be that the flash drive is not visible in the Boot Menu due to a boot mode mismatch. Most devices support two boot modes: Legacy and EFI. If the BIOS is set to Legacy mode, and the flash drive is written for EFI (or vice versa), then the system will not be able to recognize it.
The only thing you need to do in this case is to specify the desired mode through the Basic Input/Output System.

USB port support
Sometimes there are situations when the PC does not see the flash drive through the USB 3.0 port when trying to install the system from it. This is most likely due to the BIOS configuration. To solve the problem, just change the flash drive to USB 2.0.
Today I will tell you how to enable booting from a flash drive in the BIOS of various manufacturers. No matter what version you have, the order of body movements will be as follows:
1. We insert our bootable USB flash drive into the USB connector of your computer. I recommend inserting it into a port located directly on the motherboard, i.e. from the back of the system unit.
2. Turn on the computer and press the key Delete(or F2) to get into the BIOS. Depending on the manufacturer and BIOS version, other keys (Esc, F1, Tab) may be used, so you need to carefully read the prompts on the screen.
In Bios, we can only navigate between tabs using the keyboard.
Below I will describe this process in detail using the most commonly used BIOS versions as an example.
Attention! Keep in mind that if you are installing the operating system from a flash drive or CD and have selected the boot device in the BIOS rather than in the boot menu, then after the first automatic reboot of Windows you will need to enter the BIOS again and return booting from the hard drive. If this is not done, autoboot from a flash drive or CD will work again, and Windows will begin the first stage of the procedure again installations.
Setting up Award Bios to boot from a flash drive
Award Bios:
First, let's check if the USB controller is enabled. Let's go to “Integrated Peripherals”. Use the arrow on the keyboard to move down to the “USB Controller” item. Press the “Enter” key and select “Enable” in the window that appears (also using “Enter”). Opposite “USB Controller 2.0” there should also be “Enable”.
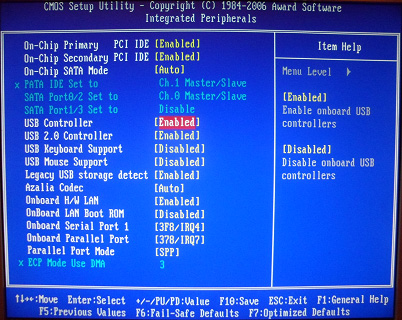 Exit this tab by pressing “Esc”.
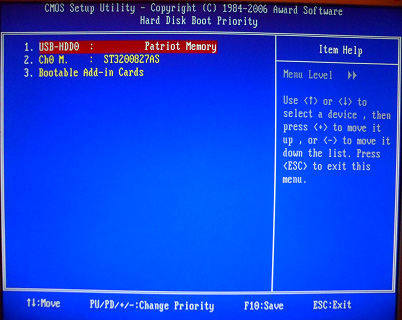
Then we go to “Advanced BIOS Features” – “Hard Disk Boot Priority”.Now in my example the hard drive comes first, but the flash drive should be there.
 We stand on the line with the name of our flash drive (Patriot Memory) and raise it to the very top using the “+” key on the keyboard.
 We leave here by pressing “Esc”.
Setting up AMI Bios to boot from a flash drive
If, after entering Bios, you see such a screen, it means you have AMI Bios:
 First, let's check if the USB controller is enabled. Go to the “Advanced” – “USB Configuration” tab.
 Opposite the items “USB Function” and “USB 2.0 Controller” should be “Enabled”.
 If this is not the case, go to this line and press the “Enter” key. From the list that appears, select “Enabled” (also using “Enter”).
Then exit this tab by pressing “Esc”.
Let's go to the tab “Boot” – “Hard Disk Drives”.
 Now my hard drive is in first place, but I need to put a flash drive here. We go to the first line, press “Enter” and in the window that appears, select our Patriot Memory flash drive.
 It should be like this:
 We leave here via “Esc”.
Select “Boot Device Priority”. Here, the first boot device must be a flash drive.
 Press Esc.
Then we exit the Bios, saving all the settings made. To do this, go to “Exit” – “Exit & Save Changes” – “OK”.

Setting up Phoenix-Award Bios to boot from a flash drive
If, after entering Bios, you see such a screen, it means you have Phoenix-Award BIOS :
 First, let's check if the USB controller is enabled. Go to the “Peripherals” tab – opposite the “USB Controller” and “USB 2.0 Controller” items there should be “Enabled”.
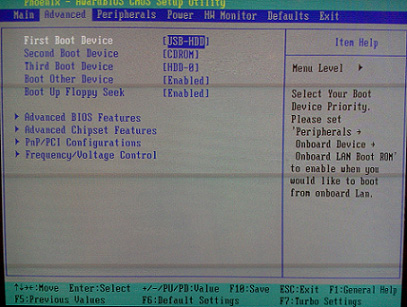
 Then go to the “Advanced” tab and opposite “First Boot Device” set “USB-HDD”.
 After that, exit the Bios, saving the changes. To do this, go to “Exit” – “Save & Exit Setup” – press the “Y” – “Enter” key
 That's practically everything you need to know in order to boot from a flash drive. In my article, I described the process of setting up the BIOS of the most popular versions: Award And AMI. The third example presents Phoenix-Award Bios, which is much less common.
The described procedure may differ slightly in different BIOS versions. But the main thing is that you understand the principle of setting itself.
By the way, I would also like to add: in order to choose which device to boot your computer from, it is not necessary to change the settings in the BIOS. You can immediately call up a special menu after turning on the computer to select boot devices (this can be done by pressing the F8, F10, F11, F12 or Esc key). In order not to guess with the keys, look carefully at the monitor immediately after turning it on. We need to have time to see an inscription like this: “Press Esc to selest boot device.” In my case, it was necessary to press “Esc”.
So, you have decided to install a new system, or use some kind of utility to work with the same system, but it must be written to a flash drive. You insert a flash drive into a USB port, and then a question arises: Why doesn't the BIOS recognize the bootable USB flash drive??
You created a bootable USB flash drive, but the BIOS does not see it. Many factors play a role here, for example, you made the bootable USB flash drive incorrectly, the BIOS needs to be reset or even updated, the program you used to create the bootable USB flash drive turned out to be damaged, and much more. Let's try to solve this problem.
What to do if BIOS does not see the bootable USB flash drive
How to make a bootable USB flash drive and how to do it correctly
First, you should make sure that the flash drive really does not work with your computer. You can check this by using the drive on another PC or laptop; if the same thing happens there, then you probably created the bootable USB flash drive incorrectly.
I would like to note that if you just threw files onto a flash drive and think that it will work, then I hasten to disappoint you. To record a distribution of a system or program, special utilities are required. I will list them now:
- WinSetupFromUSB
- Rufus
- Windows USB/DVD Download Tool
- WinToHDD
- Windows To Go
- Ultra ISO
And this is not all the programs, but I have listed the most basic tools. I have a review for each. For example, if you want to make a bootable USB flash drive with Windows, then use Rufus or WinSetupFromUSB. If the first one does not work and the flash drive is not visible in the BIOS, then use another one.
I will list the articles that I talk about creating a bootable USB flash drive. You probably know many of the methods.
If you have used all the specified utilities and the flash drive still does not work, make sure it is working properly, try formatting it to NTFS or FAT32, and try booting from another computer. And if this does not help, then use another flash drive.
How to set up BIOS for a bootable USB flash drive
First you need to understand whether the flash drive is not visible at all in the BIOS, that is, there is no line “USB flash drive name”, or there is a line, but when you click on this item you see nothing but a black screen.
There are two options why this happens - your flash drive is faulty or you recorded the image incorrectly, or there are problems with your BIOS, so the BIOS does not see the bootable flash drive.
The best option is to boot from a flash drive - . You can enter it using the ESC key or F8. It's different on different devices, that's why . Having opened the Boot Menu, you will see a list of devices from which you can boot - flash drives, hard drives, CD-DVDs. You'll need to find something like a Kingston 8 GB USB or similar, depending on the brand of your flash drive.
If you do not have the Boot Menu, or it is disabled, then in the BIOS on the tab Boot or Advanced you need to move your flash drive to first place. This is done using the F5 and F6 keys, but I repeat, the parameters may differ for each BIOS model, you will have to figure it out yourself, or write in the comments so that I can help you.


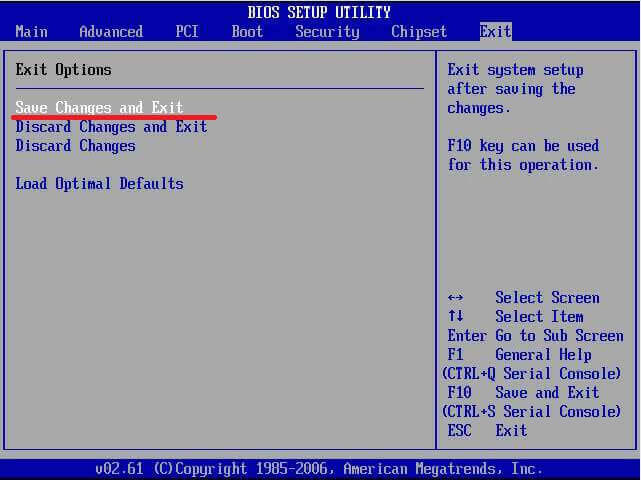
After you have placed the bootable USB flash drive in the first place in the BIOS, press the key F10 to save the current BIOS settings. Or on the tab Exit select the option Save Changes and Exit.
Finally, you can if none of the above helps. Follow the link and read about it. Typically the reset option is located on the Exit tab and is called Load Optimal Defaults or a little differently.
Let's summarize all of the above and say why the BIOS does not see the bootable USB flash drive:
- The flash drive is faulty. Use another flash drive, or try using it on another PC.
- The wrong program was selected to create a bootable USB flash drive.
- The image recorded on the flash drive is damaged and needs to be replaced.
- The BIOS settings are incorrect, you need to reset it.
- The BIOS does not support booting from flash drives (this also happens), then the BIOS needs to be updated.
If you have such “misunderstandings” with a flash drive, then try creating a disk with Windows or the desired program. Regarding this, I would like to note that you need to be extremely careful. First, you need to find the correct firmware that fits your motherboard, if the wrong version is selected, or from a different board, then there is a high probability of failure of the entire motherboard, and you certainly don’t want that.
You decided to install Windows: you recorded a digital copy on a flash drive, configured the BIOS, rebooted your computer or laptop, but for some reason the installation did not start. What's up? Why doesn't the BIOS see the bootable USB flash drive? It seems like everything was done correctly...
There are 2 most likely reasons here. The first is that the BIOS does not display the flash drive because it is not bootable. Second, you haven’t configured the BIOS quite correctly.
Although there is one more nuance - your BIOS is too old. It does not support USB drives, and therefore does not see them. In this case, you can install Windows from a disk.
As for the first two reasons, we will look at them in more detail.
Did you write the bootable USB flash drive correctly?
The fact is that it is not enough to simply copy files. In this case, it will not be considered bootable. This is why the BIOS does not see your flash drive. It must be recorded only using special programs. There are plenty of them, but personally I use UltraISO. Why? Because she:
- Free (with a 30-day trial period).
- Records both Windows 7 and Windows 8.
- Easily writes images to a 4 GB flash drive (some programs only support USB drives with a capacity of 8 GB and higher).
And most importantly: creating a bootable USB flash drive in UltraISO is as easy as pie. First, you need to install the program (link to the developer’s website) and connect the USB flash drive to your laptop or computer. And after that there are only a few steps left to complete:

During recording, all information from the USB flash drive will be deleted. The program will also warn you about this. Therefore, if there is important data on it, copy it to another location.
Correct BIOS setup
If you did everything according to the instructions, then rest assured that the USB flash drive was written correctly. And now it really is bootable. Try it - it may work to install Windows.
Therefore, restart your laptop or computer and go into the BIOS. To do this, you need to press a certain button several times. Most often this is Del or F2, although it may be different (depending on the motherboard model and laptop brand).
Next, you need to go to the tab whose title contains the word “Boot”. This is where you configure the boot priority of devices when you turn on your PC or laptop. By default, the hard drive boots first (First Boot Device), followed by the drive. In this case, you need to put the flash drive (USB-HDD) in first place, and temporarily lower the hard drive (Hard Disk) to second.

When exiting the BIOS, be sure to save the new settings! To press the button that is responsible for the “Save and Exit” item.

That's it. Now, if the USB flash drive is connected to a computer or laptop, and the BIOS is configured correctly, Windows installation will begin.
P.S. If this is all too complicated for you, then you can go to the Boot Menu. This is one of the BIOS options, which is designed specifically to quickly configure booting from a flash drive.
P.S. If the BIOS stubbornly refuses to recognize the USB flash drive, then it may be damaged. But before you throw it away, read it. Perhaps everything will work out and it will last a couple more years.