Games using multithreading. The use of multithreading in games. How to find processor information
Personal computers and laptops with multi-core processors have enormous computing power. Thanks to the parallel operation of all cores, the device is able to show impressive performance in computer games and programs. In this article we will figure out how to enable all cores on Windows 10, which applications can be used to view information about the processor, and so on.
Depending on the workload of the computer, the occupancy level of each core may differ from the others. In addition, each core is capable of operating at a separately set frequency due to BIOS settings or motherboard software. The load on the computer is distributed evenly, which is why you get high performance.
There is only one case when a dual-core processor will not use the second core - this is the procedure for turning on the PC. To start the operating system and get the computer ready, the BIOS uses the resources of only one core. You can use all the resources and speed up the process of turning on your computer a little. However, you should not expect significant changes - speeding up the PC startup must be achieved using other methods (for example, installing it on an SSD).
Switching methods
You can activate all 4 cores in a 4-core processor when you boot your computer using the following methods:
- through standard system tools;
- through settings
The instructions described below are suitable for 32 bit and 64 bit OS. Home, Pro and Enterprise versions are supported. In order for the computer to begin using all its power at startup, the following operation must be performed:
- Go to the Run application using the Win + R keys. Enter the line “msconfig” and press Enter to run.

- In the window that opens, you will see the “Download” tab.

- In it you need to select your OS and click on the “Advanced boot options” button.

- Check the “Number of processors” checkbox and set the maximum number of cores. You also need to increase the “Maximum Memory”. The PCI Blocking setting must be disabled to ensure that the computer distributes the load evenly across the number of cores. To complete the settings, close the window with the “OK” button.

Tip: You cannot set the maximum memory amount to less than 1024 MB, so as not to achieve the opposite effect - slowing down the computer boot.
After saving the settings, you need to see how many cores are working now. If all parameters are reset, then reduce the “Maximum Memory” and test again. To avoid repeating this procedure, in the “System Configuration” window, check the box next to “Make these boot parameters permanent” and finish the job with the “OK” button.
In BIOS
It is worth warning that changing BIOS settings is recommended only if your personal computer stops booting. Without minimal knowledge, we do not advise you to use this method if the one described above works.
So, to enable a multi-core processor you need to:
- Launch BIOS menu. This is done when you turn on the computer. On different motherboards, a separate key is responsible for starting. On most computers these are Del, F1, F2, F10 and similar system buttons. On the loading screen you will find information about your key.
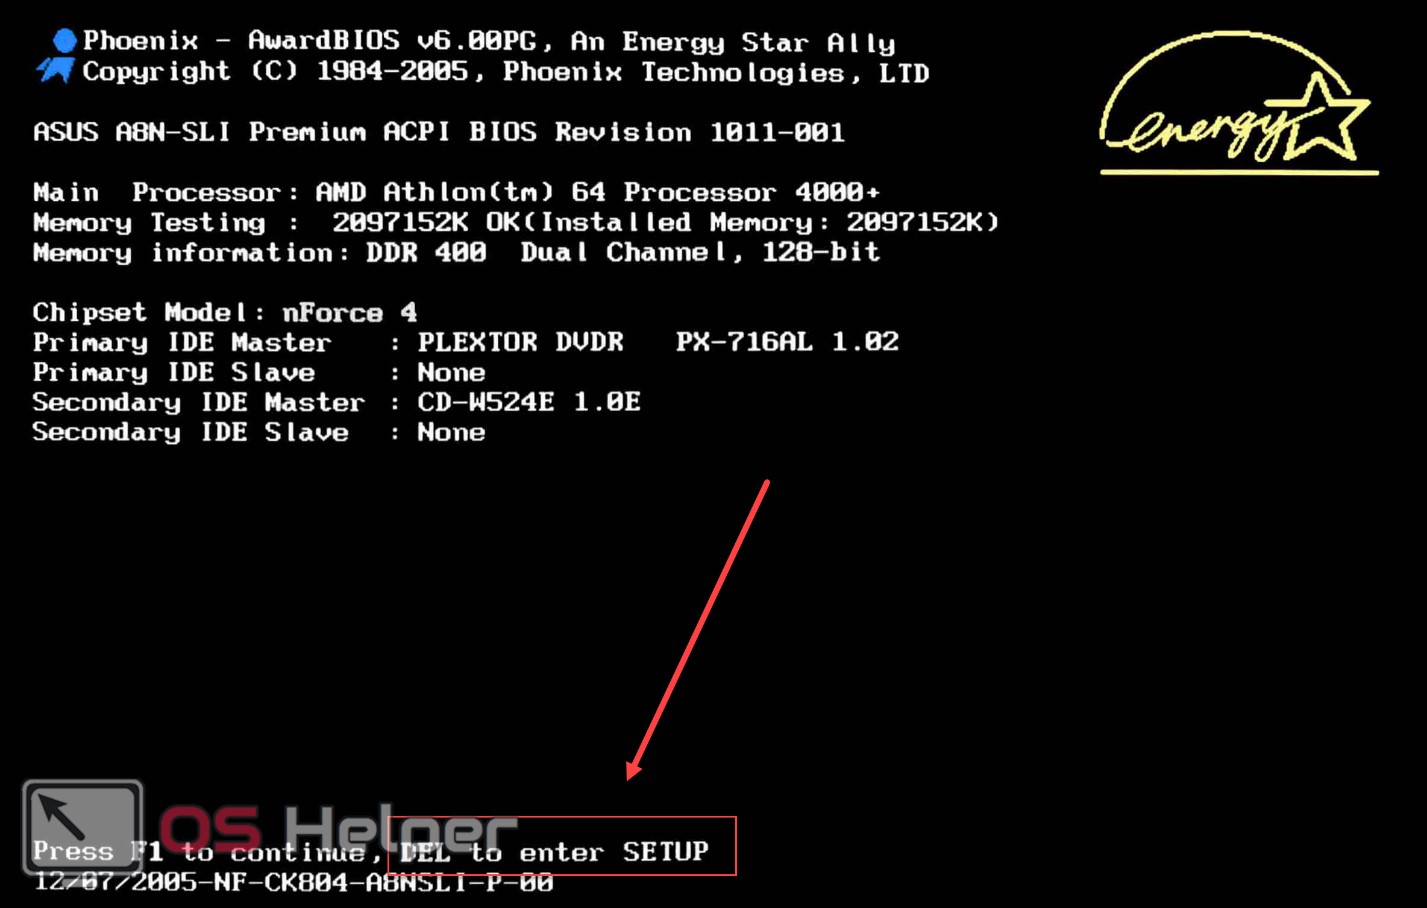
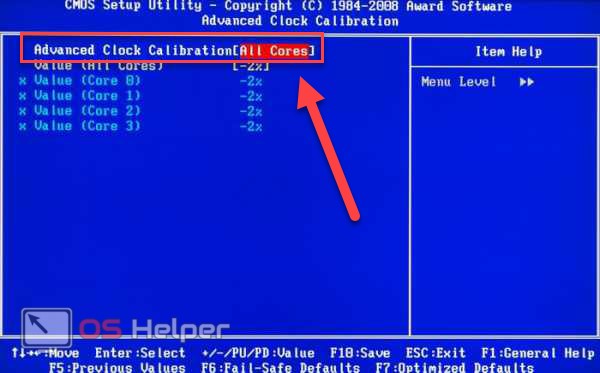
- In the BIOS menu you need to open the “Advanced Clock Calibration” section. Here you need to set the “All Cores” parameter.
- To save and reboot, press F10 and confirm with the Y key.
Now you know how to boot your computer using all processor cores.
How to find processor information
You can find out how many cores your PC has and what specifications the CPU has in the following ways:
- standard OS tools;
- third party utilities.
First, let's look at the built-in capabilities of the operating system.
general information
You can view information about the processor and its characteristics as follows:
- Go to "Options". To do this, right-click on the “Start” icon and click on “Options” in the menu.

- Next, go to the “System” section.

- Now open the “About the system” section.

- In the list of all information, find the marked line. The name and frequency of each core are indicated here.

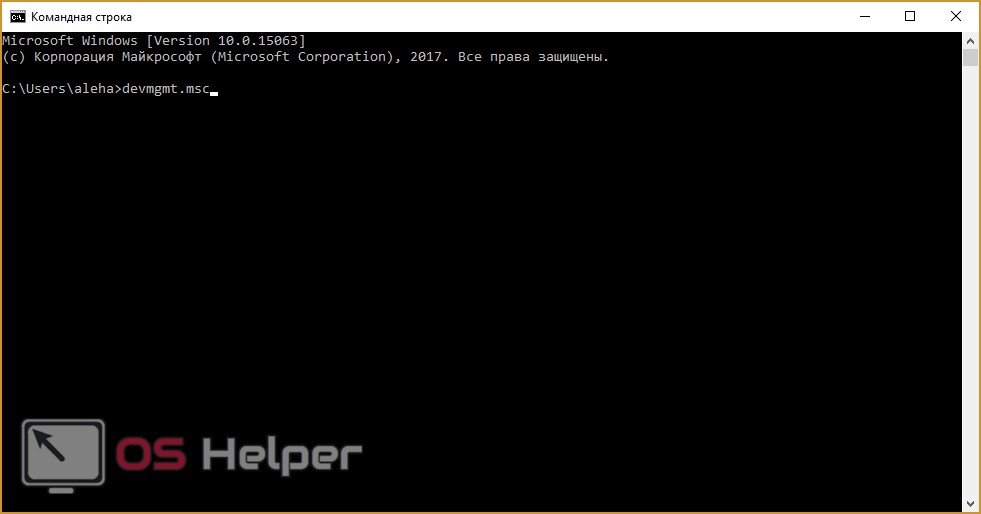
You can learn more about the equipment through the “Device Manager”. All ways to open this program are presented below:
- To open Device Manager, enter the appropriate query in the search bar.

- You can also launch the program through the Control Panel. Open it in any convenient way, and then go to “Hardware and Sound” (1).

- Next, click on “Device Manager”.

- At the command prompt, you need to enter “mmc devmgmt.msc” to launch Device Manager.
The application window looks like this:

In it you need to expand the “Processors” branch. The screenshot shows a 4-core device as you see 4 identical lines. Right-click on one of the lines and select “Properties”. In the window that opens you can find all the information on the processor.
Third party utilities
If you are not satisfied with the functionality of Device Manager, you can install one of the third-party utilities. The most common are CPU-Z, AIDA64 and Everest.
CPU-Z can be downloaded from the official website using the link. When you launch it for the first time, the utility will collect data about your PC configuration. The first tab contains all the information about the CPU:

In the remaining tabs you will find a detailed description of other equipment. For example, the SPD will contain a detailed description of the RAM (Module Size, Manufacturer, and so on).
The AIDA64 program is downloaded from the creators' resource. On the left side of the window you need to open the “Motherboard” branch and go to the CPU subsection. The Multi CPU column will indicate the number of processors:

The latest utility is Everest. It is very similar to the previous software. It also contains all the information you are interested in about the CPU in the “Motherboard” section:

Results
Enabling multithreading is possible only for the operation of starting a personal computer. In all other cases, the CPU uses all resources simultaneously, so there is no need for manual configuration.
Video
Below is a video instruction with a detailed description of all the actions and operations from this article. With the help of a visual aid, you will be able to understand the points and steps of the manual that are unclear to you.
Tweet
Preface
There are plenty of misconceptions about how computers work. Some are very popular, some are widely known in a narrow circle. I have chosen a couple of especially tenacious, faith-supported ones who love to practice computer optimization. Their refutation does not require long explanations of the nuances of the operating system, programs and processor. It is enough to use logic.
Before I begin describing the myths, I will write a few theses on which I will rely in the future. If you don't agree with me, think twice why. Maybe you and I live in parallel universes?
So, here are theses that for me are the truth, supported by facts and knowledge. I hope that after reading this carefully you will understand where I am going with this.
1. Operating system (OS) - an intermediary between the computer hardware and programs(including games). In this case we are talking about Windows. It is the OS and the running drivers that draw the picture on the screen, ensure the launch of programs and allow the running software to use the computer’s resources: processor, RAM, video card, network, and the like. In fact, Windows consists of a kernel - a small but complex program that regulates resource allocation priorities, is responsible for isolating programs and does much more related to the functioning of software, running drivers that interact with the computer hardware through kernel functions and the part itself isolated from the hardware , where our games, browsers, etc. run. Those who want to learn more can read the Wikipedia article “Windows NT Architecture,” but this is not necessary. The main thing is to know that the system is an intermediary between the physical part of the PC and the programs that we humans usually work with.
2. The capabilities of the operating system determine the capabilities of the software. Application programs and games that we see on the screen do not have direct access to the computer hardware; they Always work through an intermediary - the OS. If Windows (and the drivers installed in it) can’t do something, then programs won’t get to that “something”. For example, there are several versions of drivers for the sound card of my old laptop. It so happens that in one driver you can adjust the microphone sound gain, but in the other there is no such adjustment, but you can enable sound enhancement with Dolby Surround technology. Therefore, if I want to listen to music, I have to install a driver with Dolby Surround. When I record a video lesson, I put on another one, where the microphone works much better. Alas, no program can bypass these restrictions and give access to everything at once, because there is no driver that has both of the mentioned functions. This rule is always followed. Games do not have direct access to hardware, only through an intermediary. For example, graphics are often created using commands, but for the purposes of this article that is not important.
3. Operating system creators never intentionally try to limit computer performance.
Otherwise there will be a lot of lawsuits. For example, Apple was fined 5,000,000 euros when it turned out that the OS of older iPhone models reduces performance over time. And another 5 million euros for the fact that the slowdown function worked secretly, without notifying the device owners. That is, you need to understand that if Windows had some kind of function that, without explicitly notifying users, somehow reduced the speed of CPU calculations, disabled processor cores, or limited the capabilities of hardware, then it would have been written about in all technical (and not only) media . There would be lawsuits and reputational losses. But this is not and will not happen, because the Windows family has been studied far and wide, there are no controversial issues left.
I hope you have read the above. Computer optimization myths related to disabling and enabling cores, which I will discuss below, are precisely based on a lack of faith in the veracity of these theses. For some reason, many people believe that Microsoft does not allow the computer to “open up” without tinkering with the settings.
Optimizing cores and memory using MSConfig
The advice to change settings in the MSConfig system utility is based on the assumption that Windows does not use all processor cores and megabytes of RAM at boot. Allegedly, you need to specify the required number of them using a “secret” setting so that the computer turns on faster and everything works faster. You can get to the “secret” option like this: Start - Run (on Windows 10, use the search field instead) - Execute
msconfig - OK. The program will start system configuration :
(msconfig.exe). Tab Need to click Extra options,
to open Windows boot options and there will be the coveted “super secret” options:
Until crazy hands get to the settings, nothing will be indicated here, no checkboxes will be ticked. Why would Windows developers limit system performance?
But people who do not use critical thinking think differently: since the checkbox is initially unchecked, it means the limitation is enabled. Allegedly, the absence of checkboxes prevents the operating system from knowing how many cores the processor has and how much RAM is installed. And supposedly you need to specify manually:
There are several options for this advice. I went through sites dedicated to Windows optimization, selecting a couple. For example, a certain Yuri believes that the default is to boot from one core:
Others remember RAM. “PC Master Blog” claims that she has the same problem.
The beginning of the council
I cropped some of the text to avoid a long screenshot. Here's what the author advises next:
He advises specifying not only the number of cores, but also the memory size. And at the end he says that it is possibletake off tick.
Stop. Where is the logic? An option is installed and then disabled, how can such manipulation affect anything in principle?
Where does the myth come from? I believe this is not only a matter of ignorance of the advisers’ equipment and lack of logical thinking, but also the ambiguous official help for MSConfig. In the article MSConfig the System Configuration Tool on the official Microsoft website, the description of the options really leaves room for speculation if you don’t know the context:
Translation: “If you click on Advanced Options (on any OS), you can set options such as the number of processors allocated to the operating system at boot or the maximum amount of RAM. (As a rule, usually not noted).”
The text of the official instructions for using MSConfig does not contradict the myth: you can indeed specify how many processors and RAM to use at boot. But these options are not intended to improve performance, but to restrictions for testing purposes.
Actually Windows Always uses All processors and processor cores and all RAM. No one thought to limit the system, especially during boot.
Options in msconfig are needed by programmers to test programs so that limit available resources, simulating a slow PC on a fast one.
If you think about reputational losses, fines, etc., you realize that the myth about setting up in MSConfig is complete nonsense. How crazy can you say that Windows doesn't use all possible resources when the computer boots? After all, it is in the interests of Windows developers to make sure that the computer turns on as quickly as possible without fiddling with the settings. Imposing restrictions is stupid.
Some "geniuses" are trying to prove that the "Number of processors" option speeds up the computer, because when set to 1 games start to slow down. There is no logic in this argument. With the per-core limit enabled, performance does indeed decrease (this is especially noticeable in games), but by default restrictions are disabled and programs are free to use all the cores as they please. That is, the options in MSConfig work as intended - they allow the user to limit PC resources if desired.
Fortunately, this advice about settings in MSConfig is harmless. Setting the maximum values does not affect the operation of the computer in any way, because the result is the same as with the options turned off.
For the most obtuse: just uncheck the boxes.
It doesn't matter what is in the fields - one core or a million. It doesn’t matter what’s in the “Maximum Memory” field. What you play, how old your hardware is, also doesn’t matter. Just uncheck all the boxes, click OK and move on with your life. There are no secret settings in MSConfig to “unlock” processor cores and memory.
Force the game to use all CPU cores
The second myth is more difficult to explain. The fact is that programs do not work at all as it seems to PC users. And where there is a lot of ignorance, there is a lot of the Dunning-Kruger effect and, of course, myths.
Dissatisfied with the speed of launching programs, the frame rate of games, people like to look at the CPU resource consumption in the Task Manager and engage in pointless attempts at something optimize. For example, they try to adjust parameters like the previous setting so that their favorite program loads 100% of all processor cores.
The problem is that many of the manipulations popularized by magical thinking are actually useless at best. This is akin to using phone cases to protect the body from “harmful” radiation. People who know physics will only twirl their finger at their temples, while others buy the covers in bundles and recommend that their friends do the same.
But let's return to running programs on multi-core processors. A “brilliant” idea arose on the border of knowledge and ignorance use the CPU Control program to assign all cores to games.
The council began meeting more than ten years ago. For example, when discussing the game Gothic 3, which liked to slow down on any, even the most powerful PC:
In the screenshot above the user s063r I thought that the game did not use the second processor core. Comrade Encryption advised to use the CPU Control program.
What kind of miracle beast is this?, which gets into the program code and forces the program to change the logic of its work? CPU Control is a primitive utility for assigning one or more processor cores to a process:
Unfortunately, the developers of this software acted stupidly by making it so that when launched, all running programs are automatically “assigned” to the first processor core (a certain “Manual” mode is turned on). Pay attention to the "CPU" column when running CPU Control:
One and three zeros mean that the program is assigned only the first processor core (quad-core, according to CPU Control). And it happens after launching the utility itself. What before startup, the situation was different; it cannot be seen using CPU Control. You can, of course, look at the assignments of processes to kernels in the Task Manager before all the manipulations, but who these days thinks critically and checks the operation of programs using native Windows utilities?
That is, a bad situation turns out: a person launches CPU Control and sees - oh horror - all programs are assigned to only one core!
False advice goes like this: programs run on only one core, which can be verified by running CPU Control. And there you can assign the program to use all processor cores.
But this completely false statement is easy to refute. If before launch the CPU Control utility, launch the Task Manager and on the “Details” tab, click on anyone process with the right mouse button and select “Set similarity”, it becomes clear that initially all kernels are always available to programs:
In fact, before the launch of CPU Control, there were no per-core limits. When launched, the utility itself assigns all programs the first kernel. Assigning via CPU Control to all cores returns the default setting. That's all.
If you engage critical thinking, questions will arise:
- Why doesn't Windows do this itself? Single-core processors are hard to find during the day; even office PCs have at least dual-core processors. Why is some utility supposedly able to run a program on all cores, but Windows, after decades of development, cannot?
- How does a third-party utility even manage to regulate something inside programs, supposedly distributing threads across all cores?
The answer is simple: CPU Control doesn't do what it's cracked up to do. Moreover, the ability of the software to “use” all processor cores cannot be influenced from the outside. This, in general, is an internal matter of programs - depending on the algorithms, some tasks can be executed in parallel on several cores, or only on one. Even the word “assign” is not entirely correct here - it is more correct to use “limit”.
Without rewriting the source code of programs, it is impossible to somehow influence how many and how CPU cores will be “used.” Restrict or give potential opportunity- yes, it’s possible. But “to use” if the program cannot initially do this - no, no way. It’s as if a person who is used to counting on a calculator is given a second one and told: count by two! Would this speed up his work? Of course not.
A task that is intended for one thread cannot be parallelized by outside influence. It is necessary to change the problem itself, apply other algorithms. This applies not only to computers, but to all areas of activity in general - from production processes to office work.
However, on the Internet and in the comments under this text, people seriously convince that the utility helps, that games begin to run faster. Are they wrong? Not really!
The myth is very tenacious because Sometimes reassigning software to different cores makes the computer more responsive. Occurs in a situation when a process is running in the system that heavily loads the processor, which the user is unaware of due to inability to use the system Resource Monitor. This could be some hidden virus miner or a browser tab with a large number of heavy elements on the page (videos, online games, advertising). Then assigning only one core limits the resources available to the malware and allows the remaining processor cores to work for the benefit of the game, because the user will assign all cores to it. But this is treating the symptom, not solving the problem.
How should you actually configure it?
- Get busy.
- Look through the Task Manager and the system Resource Monitor to see what exactly is loading the CPU (or through a third-party utility like Process Explorer, because miners like to close when the Manager starts, thus hiding their negative impact).
- Upgrade: install an SSD instead of a hard drive, install a faster processor and video card, add
Then get what you want: increased PC performance.
By the way, CPU Control on eight-core systems sees only four cores. Looking for advice on how to enable missing kernels?
In 2005, Intel released the first 2-core CPU for personal computers, the Intel Pentium D, laying the foundation for multi-core computing for home programs and applications. Modern CPUs have a larger number of cores and computational threads compared to back in 2005. For example, the Intel Core i7-8700 has 6 cores and 12 computing threads. In this article we will tell you how to enable all processor cores on Windows 10.
Run all Windows 10 processor cores
By default, Windows systems use all the CPU power to achieve the best performance. But if a computer malfunctions or is exposed to viruses, the number of working threads may differ from the maximum.
First, let's check the CPU for "multi-core".
Open Device Manager (Win+X) and expand the Processors list.
If you do not have a multiprocessor system (when the motherboard allows the use of more than one CPU, found in the server segment of computers), the number of all computing cores of the processor (both physical and logical threads) will be displayed.
You can also check the specifications of your CPU on the manufacturer's website - Intel or AMD.
You can also check the quantity through the Windows Registry Editor. Open the registry editor (regedit) and follow the path:
HKLM\HARDWARE\DESCRIPTION\System\CentralProcessor
This thread will contain information about the version, model, revision, frequency and other parameters of the CPU.

You can configure the number of cores on Windows 10 in the System Configuration settings. To do this, open the Run window (Win+R) and enter the msconfig command.


A window for setting up memory and processor cores will appear in front of us.

By default, all checkboxes should be unchecked (the number of cores is indicated as 1) and these parameters are inactive. To activate all Windows 10 processor cores, check the “Number of processors” checkbox and in the drop-down menu, select the maximum available number (in our case it is 8).
Click OK and reboot to make changes to the system.
You can enable the second Windows 10 processor core in the same way by setting the value to 2 or unchecking the “Number of processors” box, in which case the number will be determined based on UEFI (BIOS) data.
Connect all Windows 10 processor cores via UEFI
You can change the number of cores not only in the system parameters; the UEFI (BIOS) of the motherboard can also help with this.
Depending on the CPU parameters and motherboard manufacturer, the settings may vary significantly. Motherboards above the budget level allow you to fine-tune the operation of internal system processes, from the speed of coolers to overclocking the CPU and memory.

Using the Asrock Z68 motherboard as an example, the Advanced – CPU Configuration settings will allow you to configure the number of active cores and enable/disable Hyper-Threading and set the necessary settings for the CPU.
Hyper-Threading is Intel's multi-threading technology. Allows you to use 2 logical computation threads on one physical core. On four – 8 threads, etc.
The Active Processor Cores setting is responsible for the number of active CPU cores. In the image, the choice is between All, 1, 2 and 3, since the i7 -2600 is quad-core.
By selecting All, you can use all processor cores.
If you are wondering how to enable 2 or 4 cores on Windows 10 using UEFI, then in the additional CPU settings you can configure not only the number of cores, but also the number of threads.
It is worth noting that the functionality depends on the manufacturer of the BIOS version.
Unlock kernels for applications
It is worth noting that applications are created based on tools provided by Microsoft. Therefore, the application is created with the necessary conditions for using multi-threading or a single core. If the application is created taking into account the use of one core, by unlocking them all, you will not notice a difference in performance.
But there are various cases where unlocking them helped eliminate some performance issues and lags. To do this, open the Task Manager (Ctrl+Shift+Esc) and go to the Details tab. Among a large number of applications, find the one you need and right-click. Then, select set similarity and in the next window select "All processors".

How to disable CPU core in Windows 10?
Using all the methods described above, you can disable CPU cores. This may help you in case of overheating, but only in extreme cases. We do not recommend disabling or enabling kernels unless necessary, otherwise you may encounter multiple system errors and BSODs.
How to unlock cores on AMD processors?
CPUs of the Phenom II, Athlon X2, Athlon II, Sempron families have hidden potential in the form of locked cores. The essence of hidden cores is to reject CPUs with a large number of them (indicators do not fit into the standard ones, errors, overheating, etc.). For example, you buy a 2-core CPU, which physically has 4 of them, but they are not active.
Unlocking and activation depends on several factors, such as the desired CPU model, chipset or northbridge of the motherboard. You will find the most detailed information on this topic on the overclockers forum forums.overclockers.ru. There is a lot of information provided there, and if you have questions or difficulties, you can clarify it immediately on the forum.
Have a great day!
All modern computers are multi-core devices, which affect system performance. However, Windows 7, like any other operating system, does not use the processor cores to their full capacity. This is due to saving resources on the PC itself. Therefore, if your programs do not slow down and errors do not occur, we do not recommend using all the cores of the graphics accelerator. This action should be performed in cases where the PC power is not enough to run standard programs and games.
Configuring kernels through the startup menu
This option for using all the processor power is the simplest and safest. It is suitable for all versions of Windows OS (except XP). Any user, even a beginner, can perform these steps.
- Press “Win+R” and enter “msconfig”.
- The System Configuration window will open. Go to the “Download” tab and click “Advanced options”.

- In the window that appears, check the “Number of processors” box so that the item with the choice of cores becomes active. We set the maximum memory.

- Afterwards we save the result and reboot the system. Multitasking mode will turn on.
IMPORTANT! If your PC turns off during advanced settings, check whether your power supply has enough power.
Advanced CPU settings with AIDA64
The AIDA64 program is useful not only for its reports on the status and characteristics of individual PC components, but also for its functions of unlocking processor cores. To use the CPU capabilities using this program, you should do the following:
- We launch the program and select “Motherboard”, “CPU” in the menu on the left.

- Next, turn on each of the cores and reboot the system.
If the involved kernels did not bring benefits, it is worth returning the settings back.
Using CPU Cores Using CPU-Z
The CPU-Z program allows you not only to check what characteristics a particular PC component has, but also to optimize the operation of some of them. In order to enable all kernels, you must do the following:
- Let's launch the program. Go to the “CPU” tab.
- In the “Theads” item you need to set the value the same as in “Cores”.

- After rebooting the system, you need to check the changed parameters.
Overclocking the processor using BIOS settings
To use all the cores of the graphics accelerator, you should go to the BIOS. To do this, restart your PC and press “F2” or “Del” several times. Then you need to make the following settings:
- Find the “Clock Calibration” section (It is only available for AMD products). Set the value to “All Cores”. In the “Value” item we set the value as a percentage.

- After rebooting the system, it is worth checking the PC for functionality.
These methods are quite simple and in rare cases cause the system to crash. However, if after editing the settings errors begin to appear, you should stop unlocking the cores and return the settings back.
To learn how to enable processor cores on a PC with Windows 7 and higher, watch the video:
Hi all! Sometimes a game or program does not work at full capacity because... Not all cores are responsible for performance. In this article we will look at how to use all the cores of your processor.
But don't expect a magic wand, because... If a game or program does not support multi-cores, then nothing can be done unless you rewrite the application again.
How to run all processor cores?
So, there will be several ways. That's why I'm showing first.
Go to start - run or win + r keys

Select your maximum number of processors.
By the way, you can find out the number of processor cores. But these are virtual cores, not physical ones. There may be fewer physical ones.

- Go to the task manager - ctrl+shift+esc.
- Or ctrl+alt+del and task manager.
- Or right-click on the control panel and select task manager.
Go to the processes tab. Find the game and right-click on the process. By the way, the game must be running. You can collapse it either Win+D or alt+tab.

Select set match.

Select all and click ok.
To see whether all cores are working or not, go to the performance tab in the task manager.

There will be a diagram in all tabs.
If not, then click again to set the correspondence, leave only CPU 0, click ok. Close the task manager, open it again, repeat everything, the same thing, select all processors and click ok.
In laptops, power saving is sometimes configured in such a way that the settings do not allow all cores to be used.
- Win7 - Go to the control panel, go to power options - Change plan settings - change advanced power settings - processor power management - minimum processor state.
- Win8, 10 - Or: Settings - System - Power and Sleep - Advanced Power Settings - Configure Power Plan - Change Advanced Power Settings - Processor Power Management - Minimum Processor Status

For full use, it should be 100%.
How to check how many cores are running?
We launch it and see the number of active cores.

Do not confuse this parameter with the number of virtual processors, which is displayed to the right.
What does the number of processor cores affect?
Many people confuse the concept of number of cores and processor frequency. If we compare this with a person, then the brain is a processor, neurons are nuclei. Cores do not work in all games and applications. If, for example, a game runs 2 processes, one draws a forest and the other a city, and the game is multi-core, then you only need 2 cores to load this picture. And if the game has more processes, then all cores are used.
And it may be the other way around: a game or application can be written in such a way that only one core can perform one action, and in this situation the processor with the higher frequency and the most well-built architecture will win (usually for this reason).
Therefore, roughly speaking, the number of processor cores affects performance and speed.